iWatermark+ For iOS Manual
iWatermark+ For iOS Help
iWatermark+ Help
Section titled “iWatermark+ Help”by plumamazing.com
Section titled “by plumamazing.com”**Latest News
**
3/16/25 – we plan on an update coming soon if you have suggestions or features you’d like to see added contact us use the link on the about page to contact us.
10/29/24 – Version 7.2.4 is available.
—
Download your watermarks for safekeeping. To learn how, tap here to go to the Help section, ‘Backup watermarks”. Once you backup your watermarks you can also share them to your other iOS devices and/or with friends, family and in your business.
Help Us Help You
Section titled “Help Us Help You”If you run into an error. Give us the steps to reproduce the problem. Screenshots of the app or from in the manual help. Send the info via contact form here.
Do you want iWatermark+ localized for your language?
Chinese was just released. An iWatermark+ user named Hans just finished validating the DeepL translated Dutch version which will be released next. We need a couple people for Japanese and Korean. If you want to help it’s super easy. This also benefits those those that speak your language but don’t speak English. To help contact us here.
Like this unique app? You can help to continue improving the app. There are many other ways you can help:
- Make a nice review. That lets Apple and others know what you think. They have never featured iWatermark+ on any of the Apple App Store main pages. That would be amazing and allow us to get a new computer which is sorely needed.
- Buy the iWatermark+ app or the in-app purchases in iWatermark+ Lite.
- Let friends, family, photography or iPhone review web sites, magazines, newspapers or companies know about the app. More sales means we can spend more time on coding.
- Give us your suggestions and report bugs.
Use iWatermark+ before posting to Instagram, Facebook, Twitter, TikTok, SnapChat and other social media to protect your shared photos and videos.
Be it photo or video — it’s always wise to watermark a photo first before sharing.
Join the newsletter, updates, tips and deals (infrequent)
Name
Join
TIPS: More info here.
First time user?
Get up to speed fast with the fun&short iWatermark+ video tutorials.
Old time user? Create a tutorial for others and post to YouTube, etc.
Setting the correct permission is simple but critical, please read this.
—Use the manual—
Please check the manual first to answer questions. On each page in the app is a question mark icon –> ? at bottom right of each page. Each ? has a different link and goes to different part of the manual relevant to that particular part of the app. You can read the manual on device and/or on your computer. Bookmark the link on your computer then if you have a question you can enjoy the manual on a BIG screen. To do that copy the manuals link and email the link to yourself or type it in:
https://plumamazing.com/iwatermark-plus-help/
Click here for the log of changes in iOS version.
Come visit us!
Check out iClock and CopyPaste for Mac or iWatermark Pro for Mac or Win directly from our site.
When you use Instagram or other social media, remember, subtle watermarks are best. We want to help all you creative people get your work seen. Follow iWatermark via (@Twitter, @Facebook, @Instagram, @Pinterest, etc.) and tag your best artworks #iWatermark to be featured!
We want you to know that we REALLY appreciate the 5 star reviews, there are well over a thousand now. Thank You! Unlike a lot of apps we are constantly updating iWatermark+. Remember we love hearing your suggestions.
If you like the continuing improvements and want it to continue, please submit an App store review and/or let your friends (especially photographers) know about the app. A simple mention by you on Facebook, Twitter, Instagram, Pinterest website, etc. might help someone decide to download it, when they buy it helps us to keep improving it for you. Big Thanks!
NEWS On the list of the 100 best apps of the year iWatermark+ is Number 4. Here’s a great overview/tutorial iWatermark+ Tutorial by Linda Sherman. More reviews on Pinterest.
Problem? Email us. A 1 star review on iTunes when you can’t find a setting does nothing for you or for us. Contact us from the main page in the app tap the ? icon at bottom right. That takes you to the manual and at top center in the nav bar is a, ‘Tech Support’, link to click. We love hearing from you if you have a question or problem that’s not covered by this manual. Thanks.
Permissions
Section titled “Permissions”You control whether apps have access to information info on your device thru permissions. The first time you use iWatermark+ dialogs will appear asking to work with 3 types of info Locations, Photos and Camera. For example if you don’t give permission to access photos when the dialog comes up then you won’t be able to open your photos.
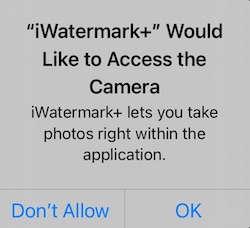
Camera
To take a photo iWatermark+ needs to access the camera. Just tap ‘OK’ for this one. This allows you to open and use the camera in the app.
Photos
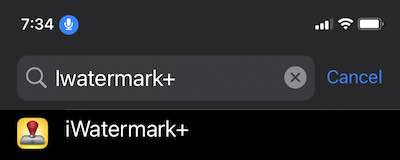
When you first try to open a photo or video you’ll get to this Apple Permissions dialog. Because iWatermark+ watermarks single and batches of photos it needs ‘Access to All Photos’ It is essential to set this permission correctly. The arrow points to the option.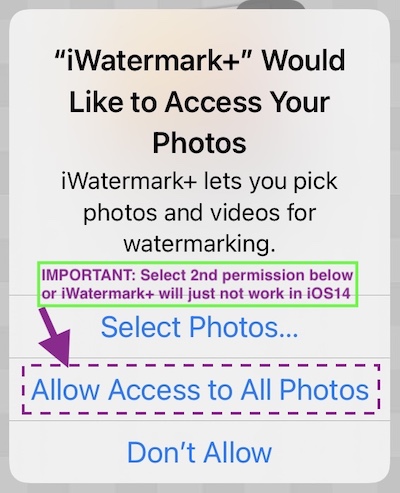 IMPORTANT: If you refused permission the first time then selecting photos, watermarking photos and many other items won’t work. To fix you need to change the permission by going into Apple’s Setting App and typing in ‘iWatermark+’ at the top here:
Then type in ‘iWatermark+’ to find iWatermark+’s settings. Yay, new iOS 14 feature!
To change the iWatermark+’s settings, open the Settings app on your phone scroll down to iWatermark+. Make sure that Photos (below) has it’s permission set to ‘All Photos‘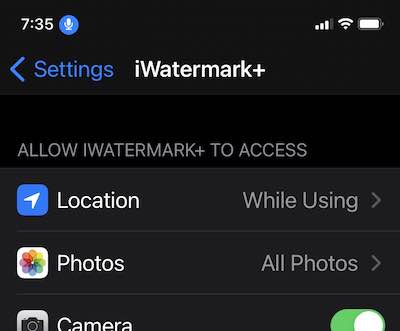
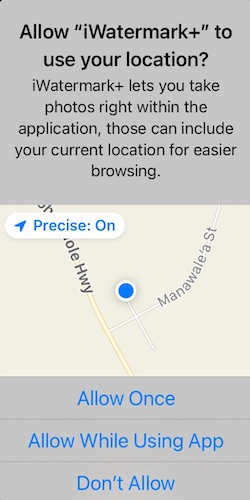
Location
To take a photo iWatermark+ needs to access the location info in photos. That one gets set to ‘While Using’. This one is important because allow to see GPS data and remove that info in watermarked photos. It also allows the use of tag watermarks.
Video Tutorials
Section titled “Video Tutorials”Here is a playlist of tutorial videos to give you a leg up on iWatermark+. It’s easier watching on a lager tablet or Mac or Windows monitor. You will benefit greatly by watching all the very short videos. This player will play a series of videos which you can stop at anytime. Individual videos are also found in their section below. Touch the top left of the player to see a list of tutorials. They include narration, if you can’t hear the tutorial make sure your volume is up and the silent mode switched is on.
Introduction
Section titled “Introduction”Thanks for downloading iWatermark+ the newest and most advanced member of the iWatermark family. iWatermark is the most popular multi-platform tool available on iPhone/iPad & Android (as both iWatermark and iWatermark+) and on Mac & Windows as iWatermark Pro. iWatermark lets you add your personal or business watermarks to any photo or video. Once added this watermark displays your creation and ownership of this photograph or artwork.
What is iWatermark? iWatermark is professional photography software that allows a new kind of watermarking. It uses a variety of visible & invisible digital watermarks (not found in any other app) to connect the photo with its creator.
Who is iWatermark for? Every person who takes photos & videos. We’ve been told it is essential for photojournalists, pro photographers, and people who use Instagram, Facebook and other social media sites.
Why is it essential? Because it allows photographers to promote their photos to the max while preventing losing control and connection as the photos author. Now when a photo is shared the author/photographer can continue to be known and credited.
iWatermark is Unique, These Features Not Found in Any Other Watermark App:
✓ Available on all 4 platforms, Mac, Win, Android and iOS.
✓ It is both a regular app and an photo editing extension that can watermark directly within Apple’s Photos and other apps.
✓ Add one or multiple watermarks simultaneously on a photo or video.
✓ Batch watermark 1 or multiple photos or videos or a mix at once.
✓ Watermark videos with any of the 7 visible and 1 invisible = 8 total watermark types.
✓ Watermark photos with any of the 11 visible and 2 invisible = 13 total watermark types.
✓ Live interactive adjusting of effects like tint, shadow, font, size, opacity, rotation, etc.
✓ Live preview of watermark(s) on a photo(s) before processing.
✓ 242 custom and 50 Apple fonts = 292 great fonts built in and ready to use for text watermarks.
✓ Over 5000 professional vector graphics especially for phototographers.
✓ Batch portrait, landscape, different resolutions and the watermark appears in the same place on each.
✓ Set beautiful engrave and embossed special text effect.
✓ Tiling a watermark in multi-locations, rotated and spaced on a photo is a breeze.
✓ Save all created watermarks to turn on/off, reuse, export and share.
✓ 12 kinds of watermarks. 7 watermarks are unique & exclusive to iWatermark (see below).
We consider everything you do to customize a photo, to make it your own, a watermark. In the past watermarks were invented and used to ID items like stamps, currency, banknotes, passports and other official documents. Nowadays, in the same way, digital watermarks infuse your identity and style into your photos and videos. The photographer Ansel Adams had a distinctive style that marks his photos, just as the unique painting style of Monet marks his paintings. Ansel Adams used black and white, clarity, contrast, huge, unpopulated, and majestic landscapes as his signature even though he also signed his work. Like the great photographers and artists you can style your work so that it is not only beautiful and recognizable but also helps protect your creations. This is why we see each of the items below even metadata, stegomark, resize and filters as watermarks because they can imbue a photo with your particular style.
The iWatermark+ 13 Unique Types of Watermarks
Section titled “The iWatermark+ 13 Unique Types of Watermarks”Type
Icon
Visibility
Apply on
Description
Text

Visible
Photo&
Video
Any text including metadata with settings to change font, size, color, rotation, etc.
Text Arc

Visible
Photo&
Video
Text on a curved path.
Bitmap Graphic

Visible
Photo&
Video
A graphic is usually a transparent .webp file like your logo, brand, copyright symbol, etc. To import.
Vector Graphic

Visible
Photo&
Video
Use over 5000 built-in vector (SVG’s) to display perfect graphics at any size.
Border Graphic

Visible
Photo&
Video
A vector border that can be stretched around an image and customized using a variety of settings.
QR Code

Visible
Photo&
Video
A kind of barcode with information like email or url in it’s coding.
Signature

Visible
Photo&
Video
Sign, import or scan your signature into a watermark to sign your creations.
Lines

Visible
Photo&
Video
Adds consistent and symetric lines of differing width and length.
Metadata

Invisible
Photo (jpg)
Adding information (like your email or url) to the IPTC or XMP part of the photo file.
StegoMark

Invisible
Photo (jpg)
StegoMark is our proprietary steganographic method of embedding information like your email or url into the picture data itself.
Resize

Visible
Photo
Change the size of a photo. Particularly useful for Instagram
Custom Filters

Visible
Photo
Many filters that can be used to stylize a photos look.
Export Options

Visible
Photo&
Video
Choose export options for formats, GPS and metadata
Below is a video that explains this further.
Why iWatermark?
Section titled “Why iWatermark?”You may own an iPhone and not consider yourself a professional photographer but the iPhone is a professional camera. It can do amazing things with light, color and texture that a few years ago was impossible. It’s convenient, fast, light and always with you. It is great for close up and far away, portraits and landscapes. Anyone these days has the potential to capture a photo or video that is unique and when shared could go viral. The right photo could bring money and fame. But even if that is not important to you it doesn’t hurt to BE PREPARED you could be some place in the future where some event of God, Nature, Man or Beast occurs and history is made. Be prepared to capture it for the rest of humanity.
Photos from cameras are anonymous. When you take a photo and share it, your friends share it, then their friends, then total strangers. Each time it has less and less and eventually no connection to you. To the rest of the world your photo is ‘creator unknown’. That is just sad. Many a great photo has gone viral (become wildly popular) that lacked any clue to the owner’s identity. That means, without any way for others to give acknowledgment, thanks or payment to the owner. The solution to this problem is iWatermark, whose purpose is to infuse your photos with your identity in a variety of ways, visible and invisible. The technologies in iWatermark and the 12 watermark tools help you to sign, personalize, stylize, secure and protect your photos. It gives a variety of ways to make sure your name, company name, url or email is associated with your photos.
iWatermark on the surface may seem somewhat similar to graphic apps like PhotoShop but iWatermark takes a significantly different angle. iWatermark is designed to process one or many photos with a variety of watermarking tools, all constructed for a unique purpose, to suffuse each of your photos with your identity as a photographer.
– Digitally sign your photos/artwork with iWatermark to claim, secure and maintain your intellectual property and reputation.
– Build your company brand, by having your company logo on all your images.
– Avoid the surprise of seeing your photos and/or artwork elsewhere on the web or in an ad.
– Avoid the conflicts and headaches with plagiarists who claim they didn’t know that you created it.
– Avoid the costly litigation that can be involved in these cases of misuse of ip.
– Avoid intellectual property (ip) squabbles.
Using iWatermark and one or more of the 12 different watermarks types can help protect photos and get photographers the credit they deserve.
2 iOS Apps Free&Paid
Section titled “2 iOS Apps Free&Paid”There is a Paid version. And a Lite version that has in-app purchases of all or parts.
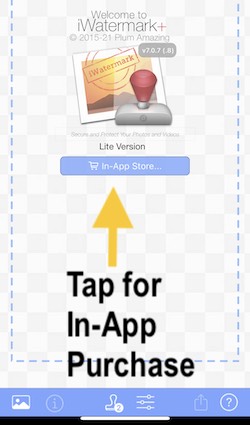
 iWatermark+ Lite
Many people try the lite/free one first to try out the app and all features. It has an icon with Free on a green banner. It has no ads. It lets you use all features but adds our watermark which says, ‘Created with iWatermark+ Lite’ to every photo.
You can upgrade to the full iWatermark+ version (below) or in the iWatermark+ Lite use in-app purchase to buy individual watermarks or all watermarks (largest discount). On the main page you can tap the button to enter the in-app store.
Lite includes in-app gifts to start you off. The gifts are Text watermark, ability to watermark photos with Text watermark and ability to watermark inside the Apple Photo app as an extension. One can make a Text watermark and apply it to a photo or use a Text watermark inside the Apple Photos app and because those are both free gift in-app items the ‘Created with iWatermark’ does not appear on those watermarked photos. So, the Lite version is the best one to share with people because they can, try before they buy, and then purchase exactly what they want.
In the Lite version with a photo and at least one watermark you will see on the bottom of the photo “Created with iWatermark” tap that banner to visit the App Store page, where 18 items are on sale: 12 watermark types, 3 “watermarking abilities” (photo, video and in-place edit), and 3 “bundles” (2-for-1-like deals, and “Upgrade All”). Some are priced at zero, and hence are “GIFTs” (like TEXT watermark).
On entering the store, a “sale item” is flashed briefly to indicate that purchasing it would remove the “Created with iWatermark” banner for that feature you were trying.
 iWatermark+
This paid version supports the evolution of iWatermark+. Every time someone buys a copy it supports more programming to improve the app which benefits everyone. Yay! The paid app does not add our watermark on your photo only yours. After getting the paid version remember to delete the free version as you no longer need it.
The apps share preferences so any watermarks you created in iWatermark+ Lite will be available in iWatermark+ and vice versa. You can use either and not lose any work.
There are many other versions you can find on our site.
IMPORTANT: iWatermark+ only watermarks a copy of your photos. It never changes the original photo. For safety do not delete your original photos and always remember to back them up.
iWatermark+ comes with 2 libraries of additional graphics.
5000 SVG (renders perfectly at all sizes) graphics of all kinds of objects and symbols and
50 bitmap graphics (can be pixelated on high res photos) signatures of famous people, logos, etc.
iWatermark+ makes it incredibly easy to create watermarks and soon you’ll want to create your own. Save your watermarks for instant reuse to cover a variety of needs and types of photos.
iWatermark is not just an app but also an ‘Extension‘ which can be used within the iOS Photos app as well as other apps. This means you can now quickly have access to the watermarking abilities not just in iWartermark+ but also within other apps, this can be very useful.
As an extension used within Apple’s Photo app, iWatermark watermarks but the saving is handled by the Apple Photos app. The Photos app saves all changes to a photo in that photo, so the watermark and other changes are saved as layers. If you want to remove it you hit Edit again and hit Revert to go back to the original photo. These versioning abilities in Apple’s iOS Photos app work well with iWatermark.
Backup & Restore Watermarks
Section titled “Backup & Restore Watermarks”A backup of your watermarks is always a good idea. Creating watermarks is, fortunately, very easy but if you have 10, 20 or more watermarks then recreating them all will take time. We highly recommend backing up to another location, like a safe. We recommend a standard 6″ thick stainless steel safe buried on the grounds of your estate or behind a picture on the wall of your study. Protection by magic spells is essential. Dragons are also a nice touch. Or, if you’re not into drama, just put them somewhere you keep other valuable digital data.
Hardware and software can get stolen, corrupted, erased, deleted and there can be changes by the app developer and by Apple that cause issues. Sometimes moving from one device to another can cause data loss. Backing up is good to do when you create or modify a watermark.
How to backup & restore
In the nav bar in the screenshot below there are icons that control backing up and restoring watermark files. Please try it now. It’s very handy for insuring your work but also a backup of you watermarks can be sent to others in your family or your business saving them time.
 The box with up arrow (screenshot below) in the bottom nav bar allows you to upload/export/backup your watermarks. First select the watermark or all the watermarks you want to export. Then tap this icon.
 The box with down arrow (screenshot below) in the bottom nav bar allows you to restore/import watermarks into your device from an .iw+ file previously exported from iWatermark+. You can zip and share .iw+ files via email or however you want to people or within a company.


Export and share your watermarks with friends, family or your company.
Simple, easy and essential.
Quick Start
Section titled “Quick Start”Overview
Section titled “Overview”1. Select media (photo, photos or a video).
2. Then select a watermark or watermarks. Or, optionally, create a new one from the 12 watermark types, hit ‘Done’
3. Save or share your watermarked photo to the Apple Photos App’s Library (this puts it in the Apple Photos App’s Library, ‘Recents’ album and also the iWatermark+ Album), Email, Facebook, Twitter, LinkedIn, Pinterest, Buffer, or Evernote, etc.
Step by Step
Section titled “Step by Step”Open iWatermark+. This what we call the Canvas Page. Here you start the creation and preview your art work. At the bottom is the Nav bar.
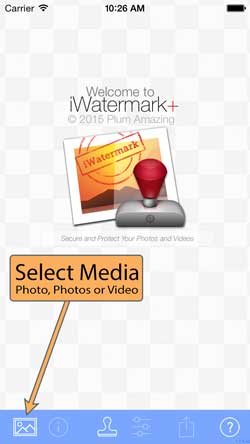
1. First, touch the ‘Select Media‘ icon  at bottom left of the above screenshot to select a photo, photos, video or import file (from cloud service).
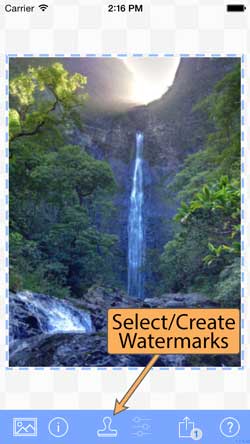
2. Touch the ‘Watermarks’ icon  at the bottom of the above Canvas Page (above) to see list of watermarks on what we call the Watermarks List Page (below). You could also select ‘Create Watermark’ at the top of the page to create a brand new custom watermark but hold off on that fun for a moment and let’s instead just select an included watermark. Go to the next point below to do that.
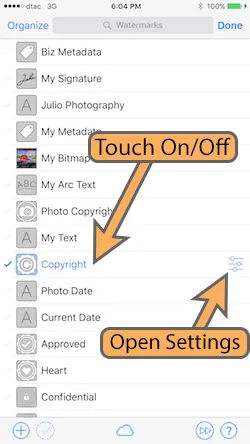
3. Next tap on the left side of the watermark ‘Copyright’ (above screenshot). At a tap the watermark goes from grey/inactive to blue/active/highlighted/ with a blue checkmark in front to indicate the watermark is now in use. Touch the ‘Done’ button to return to the main screen (below) and now you will see that Copyright watermark on the Canvas Page.
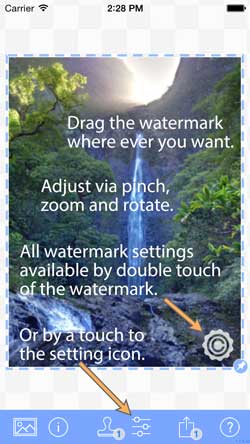
4. Adjust it by touch and gestures (above). Or go to the settings via double click to the watermark or touching the settings icon (above).
IMPORTANT: The example above uses 1 watermark but iWatermark+ allows not just 1 but selecting 2, 3, 4… or more watermarks simultaneously.
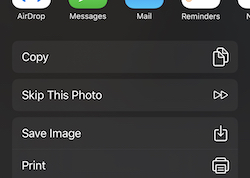
5. On the main screen click the share button in the nav bar to share your first watermarked photo. On iOS 13. It looks like this. Tap ‘Save Image’ to save to the Apple’s Photos App ‘Library’ and to the ‘iWatermark+’ album and to the ‘Recents’ album simultaneously.
Yay! You just watermarked your first photo, simple. But wait! Continue sequentially thru the manually or tap to go straight to creating your first watermark.
Gestures
Section titled “Gestures”Q: How do I backup a watermark or watermarks?A: Tap here and read the details.
Q: How do I duplicate a watermark?
A: There are two ways:
- Changing the name of any watermark will duplicate it. To test put a 2 after the name, hit done, you now have a new watermark exactly like the old one.
- On the Watermarks page slide a watermark left to reveal pin, duplicate and delete buttons.
Pin – pin the watermark so it is on (always selected) all the time. The watermark will now show a little pin icon on the right side. Selecting it again will not turn it off. This is for watermarks you want on all the time and don’t want to turn off by accident. To change slide and again choose ‘Un-pin’.
Duplicate – takes a watermark you like and clones it. You can then use as a starting point for a new watermark.
Delete – deletes that watermark entirely. No getting it back.
TIP: landscape orientation (below) removes status (carrier, time, battery) at top, providing more space.

The quick video below shows how it’s done. In the video it refers to ‘Lock’ we changed the word to ‘Pin’.
Canvas (Main Page)
Section titled “Canvas (Main Page)”The Canvas is first page you see on entering iWatermark+. It is a preview of the photo and where you can arrange and view the various watermark(s) you want to use. At the bottom of the page is the Navigation Bar. Sharing this page from the icon in the nav bar (bottom right) exports your watermarked photo(s). Tap on the video tutorial below for more.
Gestures
Section titled “Gestures”- Tap and drag a watermark on the Canvas Page. TIP: If a watermark is very small once you tap it once you can tap and drag it at a distance away.
- Use pinch and/or zoom to change the size of the watermark.
- To rotate the watermark put thumb and forefinger on the watermark and twist.
- Double touch a watermark to go direct to the settings for that watermark.
- Magnify a small square area of the canvas with touch and press (also called 3d touch).
At the bottom of the page is the ‘Navigation Bar’.
Navigation Bar & Icons
Section titled “Navigation Bar & Icons”At the bottom of the Canvas Page is this navigation bar. Each of the icons on the navbar takes you to a page that oversees one component of watermarking.

The icons above in order are named below:
Select Media | Info | Watermark List | Settings | Sharing | Help
The badge 2 on the stamp icon shows the number of watermarks presently selected.
The share icon will also show a badge of the number of photos ready to be shared.
Select Media
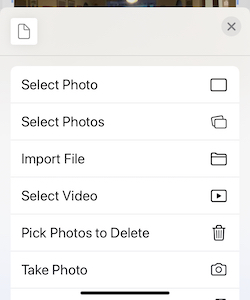
Section titled “ Select Media”When you touch the ‘Select Media’ icon this dialog for importing a photo, photos, video, pasting photo or importing files (cloud) is shown below.
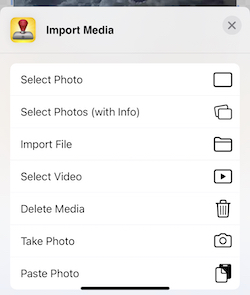 Here is where you can choose to open a photo, a batch of photos, video, take a photo, paste a photo or import a file. Details on the above, below.
Select Photo – is Apple’s picker for selecting 1 photo
Select Photo’s – is our photo picker that allows selecting a batch of photos. Tap one and drag for a continuous selection. Or tap once on the first photo and twice on the last to select everything in between (very handy).
Paste a Photo – comes from what you copied previously.
Import File – (on iOS) opens the Apple ‘Files’ App to allow choosing from cloud services like iCloud, DropBox, OneDrive, Google Drive, etc. You need to have those individual files on your device to download from those services.
Select Video – allows selecting a video for watermarking.
Pick Photos To Delete – the best/easiest way to delete photos on iOS. Tap an image then go to the last photo and double tap to select all the photos from the first single tapped to the double-tapped one. Tap on the trash can to delete them all. Be careful.
TIP: – In ‘Select Photos’ to select multiple images: tap an image then go to the last photo and double tap to select all the photos from the first single tapped to the double-tapped one. It’s handier/faster then trying to delete photos any other way.
TIP – By default iWatermark+ creates its own album «iWatermark+» that can be found in the Apple Photos App. That album name can be changed in iWatermark+ Preferences (we recommend leaving it as is).
On Mac the file types are very important to understand. On iOS Apple made the decision to keep it simple and not show file extensions or file types. But for watermarking people need to know the type of file they are watermarking. It is especially important when importing a logo (which to be the best looking needs to be a .webp). So, we’ve added the ability to easy see the extensions for photos in iWatermark+
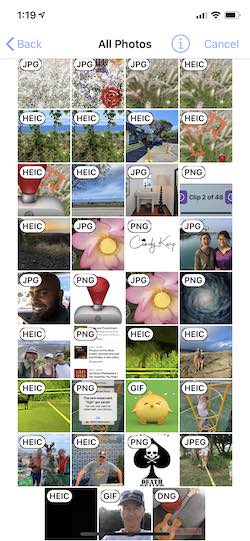
How To See File Extensions: Tap the media icon, make sure to ‘Select Photos (with info)’ to see thumbnails displaying file type, not ‘Select Photo’.
Once you, ‘Select Photos (with info)’ tap the ⓘ icon at top right (screenshot below).
 Then you see the menu (below) where you select ‘No Info’, ‘File Type’, ‘File Size’, ‘File ‘Date’, ‘Dimensions’ to display on top of the thumbnails. Very handy, right? Second part of the menu is File Order where you can select, ‘Sort by Info’ and ‘Invert Order’.
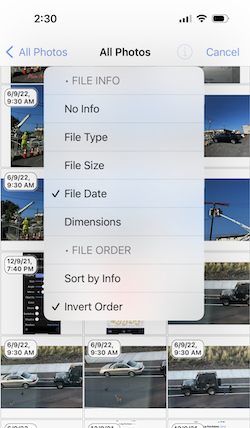
Handy info that is only available in the ‘Select Photos (with info)’ multiple photo picker not in the ‘Single Photo’ picker. Yes, you can use the multiple picker for single photos too. Some of you will ask, “Why only in the multi-photo picker?” The reason is we created the multi-photo selector to the little display badges with either info like, file formats, size, date, etc. Whereas the single photo selector is made by Apple and does not show the badges with info.
Gestures Available on the Photo Selection Page
In ‘Select Photos’ to select multiple images: tap and image then go to the last photo and double tap to select all the photos from the first single tapped to the double-tapped one.
 Info/Metadata
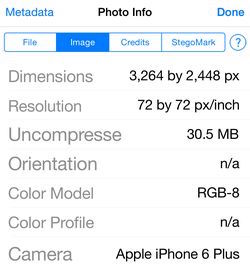
Section titled “ Info/Metadata”With a photo selected touch the , 2nd icon from the left in the nav bar, to view photo info. Here you will see the tabs for File, Image, Credits, StegoMark and a button for Metadata.
File – name, created, size, description and keywords from IPTC data if available. GPS data if present resolves into a map.
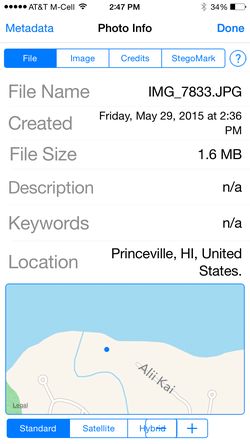
Image – shows EXIF info from the camera.
Credits – which contains user added data if ebedded there by PhotoShop, Lightroom or iWatermark.
StegoMark – to read embedded StegoMark. First open the photo with the StegoMark. If you or someone else has used a StegoMark on a photo then to read the message it contains go to this panel and enter the password or no password (if it was created without a password) to reveal the message text. No password means any iWatermark+ user can decipher the message. Once you enter the password if there is one click the ‘Detect’ button to reveal the text message.

Metadata – button at top left for EXIF, IPTC, etc.
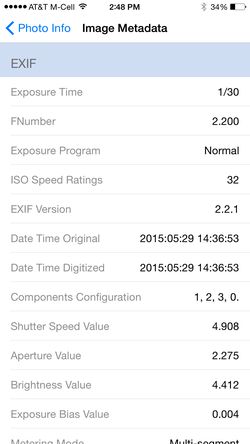
Technical information about an image (EXIF) is created by the camera. Content information (IPTC/XMP) is created and added by you, the photographer. EXIF, IPTC, TIFF, XMP are all different formats for saving info into photos. They have evolved over time. To learn more you can use your browsers to find more info.
Videos also have info. Once a video is on the main screen click the icon to get info about a video.
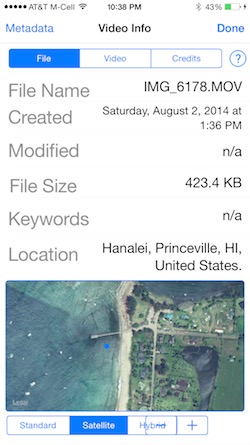
The ‘Video’ tab shows technical info on that video.

If a metadata watermark is created (below) and it is used to watermark the video with that info.
Then when that video is imported it will appear under the ‘Credits’ tab of Video Info like this:

Watermark List
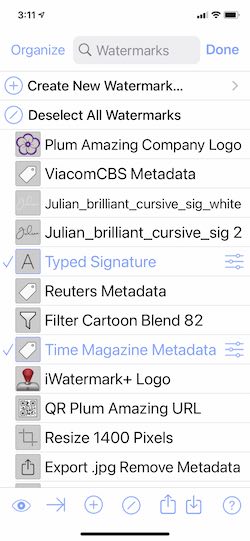
Section titled “ Watermark List”The Watermarks List page is where you can choose to create new watermarks (at the top) and keep all the example and your custom watermarks (down below). The watermark or watermarks selected in this Watermark List appear on the Canvas Page. From the Watermarks List page you can select, duplicate, delete, pin, import and export watermarks.
- Tap ‘Organize’ at top left then tap’n’drag the dragger icon on the right side up or down to rearrange the order of each watermark. Or delete watermarks by touching the red ball on the left side.
- Tap the magnifying glass (at top) to search watermarks by name.
- At the top tap the ‘+ Create new watermark’ or the + icon at the bottom. This takes you to the ‘New Watermark’ page (2nd screenshot above). For more info on creating a new watermark, tap the screenshot below.
- Tap the eye icon in the bottom nav bar to preview a watermark on your photo.
- Tap the –>| to move quickly to the next highlighted watermark.
- The / icon unselects all selected watermarks. It changes to a…
- ✓ icon in the bottom nav bar you can tap to automatically re-select all previously selected watermarks.
- The box with up arrow (screenshot above) in the bottom nav bar allows you to upload/export/backup your watermarks.
- The box with down arrow (screenshot above) in the bottom nav bar allows you to restore/import watermarks into your device from an .iw+ file previously exported from iWatermark+. You can zip and share .iw+ files via email or however you want to people or within a company.
- “Deselect All Watermarks”/“Reselect Watermarks Back” — a quick way to deselect all watermarks. And to select them back in one touch. These actions are listed on the very top of the Watermarks Page, and also on the toolbar.
- Single tap on the left side of a watermark to select, which checkmarks and highlights it in blue. To deselect tap again on the left side.
- Select multiple watermarks tap on another to select it too.
- Single tap on the on the settings icon
 or anywhere in the right one third of the watermark, to go to the settings page for that watermark.
 - Tap anywhere in the left two thirds of a watermark to select it.
- Double-tap a watermark selects it and de-selects all others then takes you to the preview page.
- Tap and slide watermark left to show “Pin/Un-pin/Delete/Duplicate” buttons. Pin insures that the watermark cannot be deselected.
****Settings
Section titled “****Settings”Change watermark settings for last selected watermark. Touch setting icon on the main page to go to the settings page for the presently selected watermark. You can also double tap a watermark on the main page to go to settings for that watermark too.
 Share/Export
IMPORTANT: Apple allows multiple items to be shared to Apple’s ‘Photos’ app’s ‘Library’ or ‘Recents’ album but only 1 item at a time to a Sharing extension. Batch processing is only to Apple Photos App’s Library.
Share allows exporting your watermarked photo(s) and video thru sharing extensions via email, save to Apple Photos App’s Library, airdrop, print, copy, Instagram, Facebook, Twitter, etc. Also if you have their app installed on your device share to GoogleDrive, Dropbox, Tumblr, Pinterest, Evernote, Buffer, LinkedIn etc. using iOS 8 sharing extension feature. Sharing extensions are put into apps and allows sharing files to that service. For example download Pinterest to your phone and you will now find that you can share from the iWatermark+ or Photos app directly to your Pinterest account. Same for Tumblr, Evernote and other services that have their made their own app with built in sharing extension.

In the screenshot above notice that there are a number of 3rd party sharing options, Instagram, Facebook, Tumblr, Pinterest, Evernote, Hootsuite, Buffer and a growing number of sharing apps support this exchange of info. Scroll right to see more. So, the sharing extensions available depend on what apps you have installed.
IMPORTANT: Missing export extension? If you have an export extension like Instagram, Tumblr, Evernote, Buffer, etc and you don’t see it in the list then scroll all the way to the right and hit the ‘More…’ icon there you can turn on the ones you use, turn off the ones you don’t and rearrange the list.
Instagram – download the Instagram app and iWatermark+ will show it in the above sharing/export area. Take a square photo in Apple’s camera app. Watermark in iWatermark+ then select Instagram in the sharing area (above) and it will take the watermarked photo straight into Instagram where you can apply filters and upload to Instagram. iWatermark+ is the simplest way to watermark a photo destined for Instagram.
PROBLEM: ‘Copy to Instagram’ sharesheet does not appear. We export watermarked files in the type they come in. If you import an .heic file then iWatermark+ exports a watermarked .heic file. ‘Copy to Instagram’ does not appear unless the file exported is a .jpg.
SOLUTION: Use a .jpg in to see the ‘Copy to Instagram’ in the sharesheet. Try it and you will see ‘Copy to Instagram’ is there. We think Instagram will update their app to allow the use of .heic files from the share sheet.
Facebook sharing is built into iOS. For Flickr, Twitter, Evernote, Tumblr, Buffer download those apps to have them show up for use in the sharing area.
The ‘Share Extension” allows other apps to offer new export options in iWatermark+
Whereas the previous ‘Photo Editing Extension’ allows apps that edit photos to watermark photos using iWatermark+.
? Help/About/Prefs
Tap the ? on any page to get to Manual, Tech Support, Preferences.
You can read the manual here and/or on your computer. Bookmark the link on your computer then if you have a question you can enjoy the manual on a BIG screen. To do that copy the manuals link and email the link to yourself or type it in:
https://plumamazing.com/iwatermark-plus-help/
On the main page touch the ? icon at bottom right to the manual in the middle and this navbar at the top:

- About – company, programmers, version info, send to friend and rate this app.
- Tech Support – how to contact us with suggestions, bugs and questions not already answered in this manual.
- Preferences – These are best left as they are unless you understand them completely. That means reading the area below. If you want to change them back to the original settings then hit the Defaults button at top left.
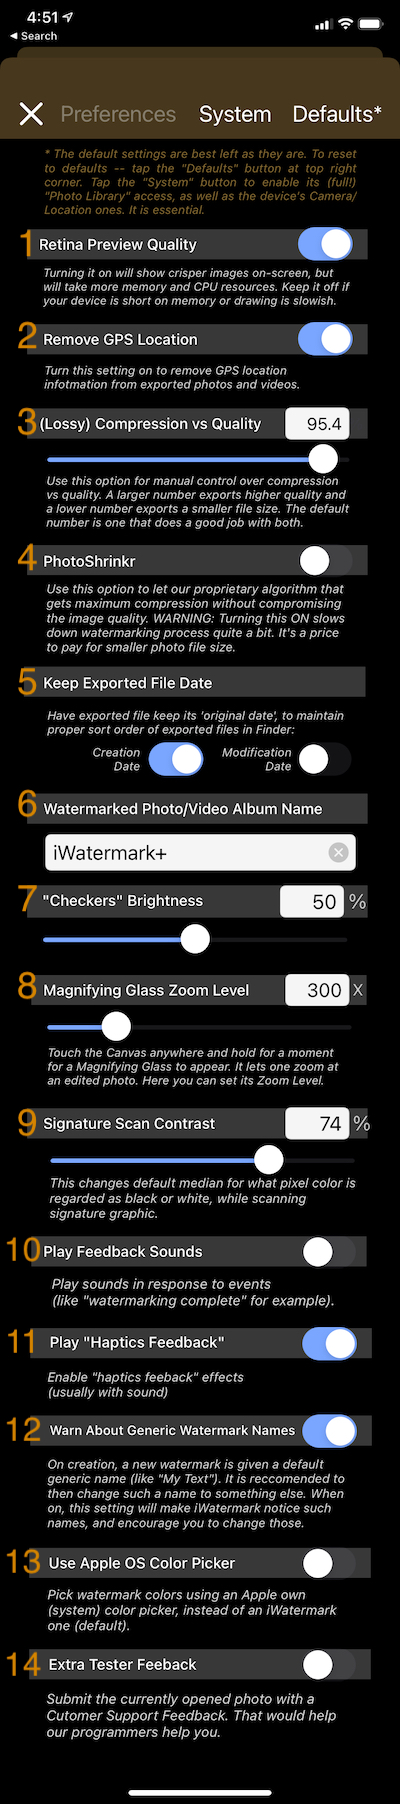
0. Defaults – Touch this to return to the original default settings
- Retina Preview Quality – iWatermark+ uses lower resolution substitute images for display for greater speed. Turning this setting on will give crisper images on screen that support it but takes more memory. Neither setting, on or off, alters export quality which is always highest quality.
2. Remove GPS Location – removes the GPS location data attached to a photo. The GPS metadata is what allows putting photos on a map in many applications. It also means that if you share a photo then people could read that info to see where you were. This is sometimes a security concern. For example a photo you share online has GPS metadata that shows your in Europe yesterday, that means you are not at your house in Iowa today and so to a burglar this might be useful information. If this is a concern then setting this preference to on will remove all GPS data from all photos exported from iWatermark+
3. Compression vs Quality setting – Higher number will export higher quality and larger size. Lower number exports lower quality and smaller file size. The default number gives the best of both. iWatermark+ uses the same tools/api for .jpg compression as Photoshop and other apps. If you decide to change this make sure to understand jpg compression, quality vs size and the tradeoffs involved by researching online.
4. Shrinkr – this our proprietary code for shrinking photos while maintaining highest quality visually. It works well but it is quite slow, maybe twice as slow.
5. Exported File Date – this sets the file date on exported file by default to the same as the original file. This maintains the sort order. - Export To iWatermark+ Album Name – in the iWatermark+ settings you can set the name of the album in Apple Photos App that iWatermark+ exports to. We recommend leaving as is so you can find all watermarked photos in the iWatermark+ album in the Apple Photos App.
7. Checkers Brightness – change the brightness of the checkers background on the ‘Canvas’ page.
8. Magnifying Glass Zoom Level – set the zoom level for the magnifying glass on the Canvas Page. Touch and hold to see magnifying glass. - Signature Scan Contrast – this changes the default median for what pixel color is regarded as black or white for newly created Signature watermarks.To reset defaults touch the button at top left titled ‘Defaults’.
10. Play Feedback Sounds – play sounds in response to events.
11. Play ‘Haptics Feedback’ – haptis are vibrations that occur with setting a user interface item or event like sharing. These reinforce the feeling of a virtual control.
12. Warn About Generic Watermark Names – on creation of a new watermark there is a warning to make a descriptive file name. This setting turns off the warning.
13. Use Apple OS Color Picker – this changes the interface for selecting colors from ours (default) to Apple’s and back.
14. Extra Tester Feedback – when this setting is on it adds tech details and the photo you have open. Reach us for Tech Support from the top of the manual in the nav bar & tapping on ‘Tech Support’. Sending an email this way helps our tenacious but slightly crazy programmer to debug the riddles/mysteries buried in ios to create new and more awesome versions of iWatermark+
Please check the manual first to answer questions. On each page in the app is a ? at bottom right. Each ? has a different link and goes to different part of the manual relevant to that particular part of the app.
Create New
Section titled “Create New”At the top of the ‘Watermark List’ is ‘Create New Watermark’. Tap this to and choose to create a watermark type seen below.

Learn about each watermark type above in ‘Watermark Types‘ section.
Watermark Types
Section titled “Watermark Types”iWatermark has 12 major types of watermarks, text, arc text, bitmap, vector, border, signature, QR, metadata, StegoMark, resize, custom filter and export options. We’ll start with the Text Watermark and use it as an example to display all settings.
Before proceeding it’s important to understand that each watermark type has a settings page, each watermark type has its own settings and setting in common with others. The ‘Text Watermark’ has the most settings and so it gets the most explanations of settings in one place.

Text watermarks are easy to create. Text is sharp at any size and depends on the available fonts. iWatermark+ gives access to 292 beautiful fonts.
Example
Section titled “ Example”To start, on the main page, touch the left most icon and select a photo as a background to help create and view your watermark. After you create a watermark then you can use it to watermark photos.
1. Touch the Text… item at the top of the watermark types page (shown below) .
2. This will lead to the Text Watermark settings page. Here fill in a name and the text.
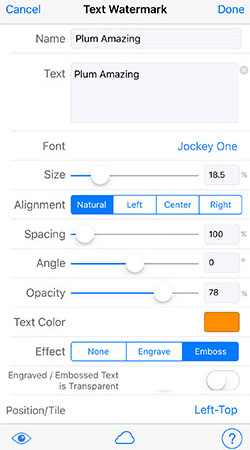
3. The settings are grayed out till you hit ‘Done’ just once. That will make the settings below active and then you can adjust scale, opacity, etc. If you hit ‘Done’ twice you will go back to the main screen where you can select the settings icon for that watermark to return.
Adjust the settings like in this video.
Adjust settings via realtime preview.
IMPORTANT: All in the settings are interactive as shown in the video above. That means when you slide the size slider the view switches to the photo so you can drag back and forth to see and choose the exact size you want. Touch slide and hold down moving back and forth till you see the effect you want then let go. This is to allow you to set the size, opacity, etc and immediately see the results of your adjustment on the photo.
The settings in the screenshot above are described in the headings below.
Type a name for the watermark. The button at top right will change to ‘Rename’. Tap rename to finish naming a watermark. Clear, descriptive names are best. It helps you find them later. Now, if you want to change the name again, the button at top right changes to ‘Duplicate’ and tapping on it will place you in a duplicate of that original watermark.
Type your text content. To have multi-line text hit the ‘New Line’ button seen below at the top right of the keyboard. A new setting called ‘Alignment’ appears. Choose from Natural, Left, Center and Right and it will be aligned like that when viewed on a photo on the main screen. To delete all the text click on the x icon to the right of the text field. Insert Tag is important click here to learn more.
Select one of the many fonts available in iWatermark. Text and the font are displayed in the actual font face, wysiwig (what you see is what you get).
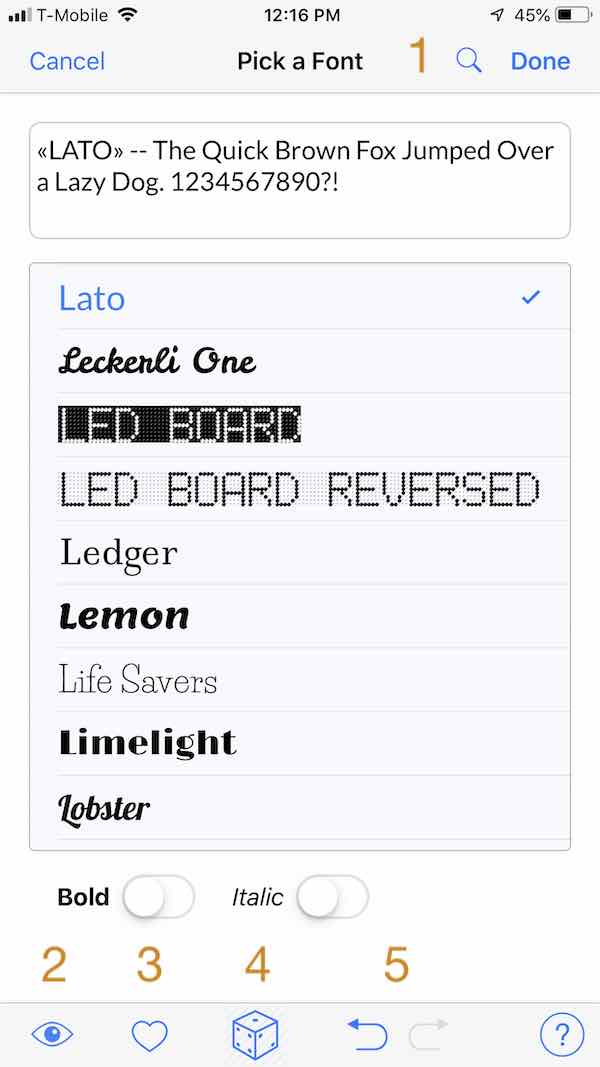
- Search for a font.
- Preview the font directly in your watermark on your photo by touch and holding down on the little eye
 at bottom left.
 - Fonts & colors you use all the time can be favorited for quick access. Click on a font you like hit the heart to turn the icon solid blue and it switches to a new sheet and adds the font there. Tap the heart anytime to see your favorites.
- Tap the dice icon to randomly change the font and instantly see what it looks like.
- The return & forward arrow icons takes you back and forward through the random fonts.
TIP: Use the search field at the top to search by name (easier then scrolling thru 300 fonts) or for font types like “mono” or ‘”script” and font language types like “Indian”, “Russian”, “Japanese”, “Korean”, “Thai” and “Arabic”.
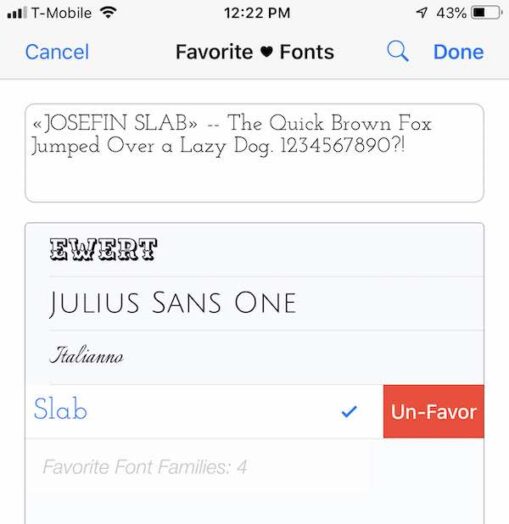
When you favorite a font (above) it places it in this favorite fonts panel. This allows you to have favorite font at your finger tips. No more scrolling thru hundreds of fonts.
Touch and drag the slider back and forth to get just the right size. Pinch and zoom of the watermark on the photo can also be used when you are actually on the main page.
TIP: Typing a size into the field next to the slider can give a size from 0 to 150% . Whereas the slider only allows dragging between 0 to 100%. It’s also possible to type in decimals like 75.5 for exact sizes.
Angle
Section titled “ Angle ”Drag the slider to rotate the watermark. Or type in the field a whole (e.g. 14) or decimal (e.g. 14.5) number into the field. It is also possible to rotate a watermark from the main page. Put 2 fingers on the watermark and twist to rotate.
Opacity
Section titled “ Opacity”Set the opacity/transparency of the watermark. Transparent left and opaque right.
Set the color of a watermark easily by tapping a color.
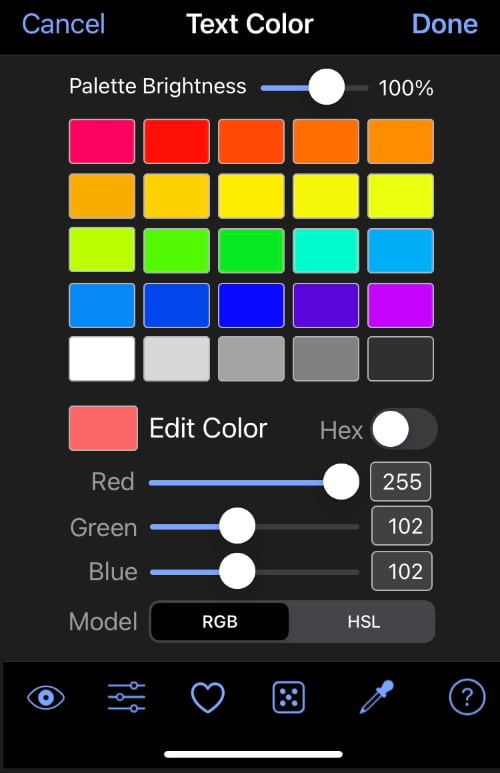
- Edit Color Settings – To see all the above options tap edit at top right or the settings icon at the bottom to edit a color. RGB or HSL values as 0..255 integers, or as 00..FF hexadecimals. (below).
- Favorites – At the bottom tap the heart icon to go to the favorites page. Tap a cell to assign that color to that cell.
- Eye Dropper – Tap his icon to go to the Canvas Page and use the center of the magnifying glass to select a color on your photo. TIP: We highly recommend using this to select a more subtle watermark color. For example your photo may have a sun setting over the blue ocean with mountains on the right. you can choose one of the golden colors of the sunset to use for your watermark on the darker right side in the mountains. This eliminates introducing a brand new color into the photo which might disturb it’s consistency and integrity. Subtle is good for watermarks. No need to bang people on the eyes.
- Radomize – to the left of the eye-dropper is a dice icon. Tap that and get a random color. This is just like on the font page where the radomize icon does the same thing except for fonts.
Here is a video of some of those details.
IMPORTANT: There are 2 color pickers the one described above and which is seen as the default color picker. The other can be seen by changing one of the preferences the one called, ‘Use Apple OS Color Picker’. Turn that on and go back to the color picker in any watermark and you will see the Apple one you see in many apps. The choice is yours.
Effect
Section titled “ Effect”None – allows choosing a text color
Engrave and Emboss – effects with optional transparency. Both make for an excellent and subtle watermarks.
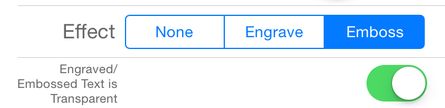
If transparency is off best results are achieved when text color is white or light colored. When text is dark or black, very little if any difference is seen between engrave, emboss and none.

Shadow
Section titled “ Shadow”Set the color and opacity of the shadow of the watermark.
Text Effect
Section titled “ Text Effect”Off, Engrave or Emboss effects. Only available for Text and Arc Text watermarks. Best results are achieved when text color is white or light colored. When text is dark or black, very little if any difference is seen when fx is on or off.
Backdrop
Section titled “ Backdrop”Select the color and opacity for the square background just around the watermark.
Position
Section titled “ Position”If you are a beginning user, touch and drag a watermark to change its location is more than adequate in most cases but the Position or Tiling setting allow more precision.
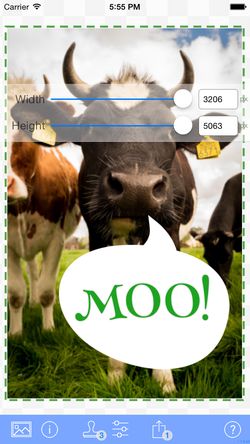
FYI: Position is relative in iWatermark+. Position for an object is determined by % from the edges. That means that no matter what size or orientation of photo you will get the visually the same results. Watermark size/position are affected by photo dimensions. The watermark will be positioned in the same place on each photo irrespective of the size and orientation of each photo in a batch. Example: in a batch of 2 photos, one low and the other high resolution, a border watermark set to be approx 10 pixels wide on one low resolution photo might when measured be 20 pixels wide on the high resolution photo. This is yet another esssential feature which makes iWatermark+ unique and appreciated by professional photographers.
Position of a watermark can be set in 3 ways:
- Tap and drag the watermark on the Canvas Page.
- By touching via the highlighted text opposite the word ‘Position’. (Left-Bottom, Right-Top, etc. text. See screenshot below) or double touching the pin icon.
- For even more precise control (by pixel) over watermark location tap on Nudge at the bottom.

Then on the Canvas Page you will see this:

which you can then use to nudge the watermark around in small increments.
Pinning
Section titled “Pinning”When you move a watermark to a position you are pinning it there. A Pinned watermark is referenced to left, center or right and top, center and bottom. In the screenshot below the watermark is at ‘Left’ and ‘Top’.
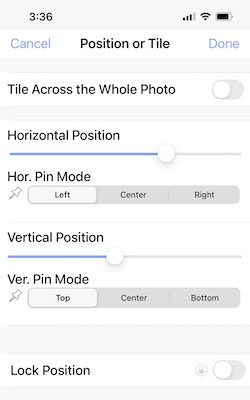
- Pick the pinned corner. Click on the Left, Center, or Right and Top, Center or Bottom.
TIP: The position of a watermark is shown by the blue white pin icons on the preview photo page (see below). Try moving the watermark around with your finger and see the pin icon move to the other corners as you approach them. Double touch the pin to go to the position settings.

Tiling
Section titled “ Tiling”Is for special cases where you want to put a watermark across a whole photo multiple times making it difficult for people to copy or use your photos by cropping. Turn on by flipping the first switch in Position displayed in the screenshot above. Turn switch to green for tiling.
The settings for tiling are pretty obvious. Move the sliders and instantly preview the changes.
- Size – reducing/enlarging the size displays more/fewer copies of that watermark on a photo.
- Gap – gap between each copy.
- Horizontal Offset – moves all the copies right or left
- Vertical Offset – moves the copies up or down.
- Angle – changes the angle of all the copies.
- Opacity – changes the transparency of the watermark of all copies.
Experiment with tiling using preview. Typically tiling is done with 1 watermark is used to add extra protection to a photo. But, for fun you can turn on 2 or more tiled watermarks simultaneously for a special effect.

The tiling above is using 1 Text Watermark but it is also possible to use Text Arcs, Graphics and other watermark types. They can be more subtle then the above but we wanted to make the tiling obvious even at a small size for the manual.
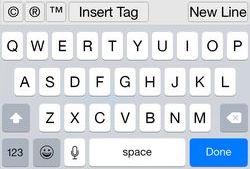
**Insert ©, **™, ®****
Section titled “ **Insert ©, **™, ®****”Insert special Characters. At the top of the keyboard in ‘Text Watermark’ settings is this:

The first 3 are pretty obvious tap those to insert those characters (copyright, registered trademark and trademark symbols).
Insert Tag
Section titled “ Insert Tag ”Tags are incredibly useful! Use ‘Insert Tag’ at the top of the keyboard (seen above) to put Metadata (like camera model, creation date, sequential numbering, file name, location, etc.) from that photo or video into a visible watermark on that photo or video. There are some example watermarks that come with the app but you can use these to create your own customized watermark to display a variety of info on your photos that will be different depending on the metadata in that photo.
To use Tags touch the ‘Insert Tag’ button you are taken to this page: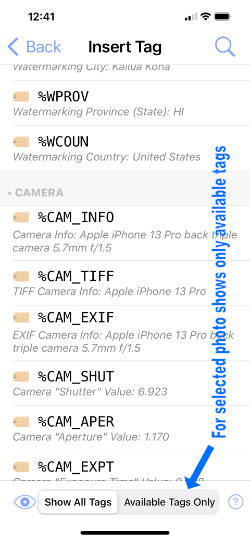
In the screenshot above at the bottom ‘Show All Tags’ shows by default. When ‘Available Tags Only’ is selected only the tags that are within the selected photo will show.
Each tag has a format, it always starts with a % so that the program can identify that it is a tag. Under the tag is the info from the metadata in the selected photo. If no photo is selected (the photo that shows on the Canvas page) the example info is generic.
Each variable that stores a particular piece of metadata from a photo. Here you can touch one of the metadata variables (tags) to insert that photo info as a text watermark. That text watermark can be formatted and other text added to help describe and explain the tag.
To see this in action, touch one of the above tags and then you have a text watermark like this.

In the above example the %CAM1 is a variable that holds the camera model info that is pulled out of each photo. ‘Camera:’ is just a description/label for the info that will follow it. In a batch of photos from different cameras that watermark might print Camera: Nikon on the first, Camera: Canon on the second and Camera: iPhone 6 Plus on the 3rd.
See the fainter watermark at the bottom of this photo which shows the Camera used and other info.
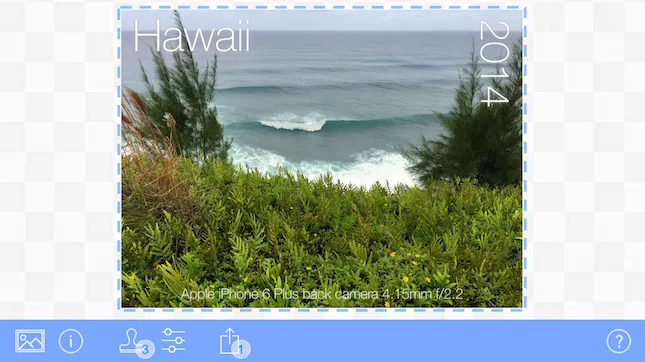
It is amazing what adding 3 watermarks and a tag can do for a photo.
TIP: One particularly useful tag is %WCNT. Use this with a batch of photos to put a steadily incremented number on a photo. So, if you have 300 photos in a batch and you have a text watermark with this tag like this:
Number %WCNT of 300
Then each photo would have a watermark saying something like Number 17 of 300.
We are constantly adding to the tags. To learn more about tags go to Text Watermark click Insert Tag and look thru the info on each tag.
TIP: It’s not possible to have different fonts and font sizes within one text watermark so if you want to do that make two separate text watermarks.
 Arc Text
Section titled “ Arc Text”An Arc Text Watermark produces a watermark of text on a curved path. Below are all it’s settings, more settings then any other watermark. The best way to understand these is to experiment and test them out. It has more settings then just a ‘Text’ watermark. Those additional settings are described below.
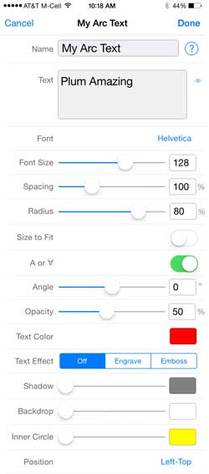
See explanation of the first text settings Name, Text and Size in Text watermark above.
Spacing
Section titled “ Spacing”Adjusting the space between letters. Similar to kerning but kerning adjusts the space between 2 particular letters whereas ‘Spacing’ adds or subtracts space between all letters equally.
Radius
Section titled “ Radius”Adjust the radius size in % up to the maximum horizontal or vertical length whichever is smaller.
Size to Fit
Section titled “ Size to Fit”Automatically resizes the circle based on word length and font size.
A to ∀
Section titled “ A to ∀”Flip the text.
Drag the slider to rotate the text around the ring. Or type in the field a whole (e.g. 14) or decimal (e.g. 14.5) number into the field.
Inner Circle
Section titled “ Inner Circle”Controls the color and opacity of the inside of the circle.d
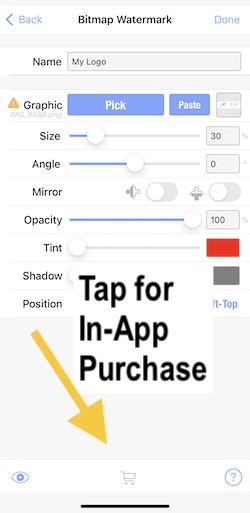
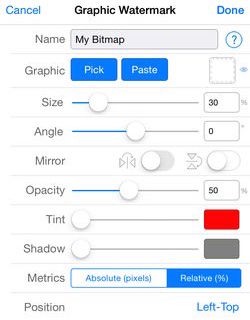
Bitmap/Logo
Section titled “ Bitmap/Logo”
**Quick Start
**
- First open a photo from the media picker
- In the ‘Watermark List’ select ‘Create New Watermark’ then ‘Create new Bitmap Graphic watermark’.
- Use the ‘Pick’ button to select your logo or graphic (.webp format) from your photo library. To get your logo or any graphic to the photo library tap here.
- Adjust the other settings to your taste.
Overview
Graphic Watermarks are good for logos, art and signatures. Use your logo or any graphic but they need to be a special graphic format called .webp with transparent background. The sample signatures, symbols and other graphics we include have transparent backgrounds and are .webp files. That means that even though the graphic is square only the signature itself shows and that which is not the signature is transparent allowing the background photo to show through. The file format to do this is called .webp with transparency and it allows the background of the watermark to be transparent (a .jpg does not allow this transparency, .webp must be used).
Below you will learn how to import a png & how to create a png file.
Q: Why use .webp with transparency for a logo watermark on a photo?
1. CORRECT ![]()
.webp with transparency
2. WRONG ![]()
White background is caused by using either:
a) .webp without transparency or
b) .jpg
A: Both graphics of the stamp above are square.
- Our stamp logo, is a PNG with transparency. This PNG has areas that are transparent, so the stamp is seen surrounded by just the background.
- It is the same graphic but either a jpg or a .webp without transparency so the white box shows as background the second stamp.
Check out the FAQ (below) or Google ‘png’ and ‘transparency’ to learn more about making .webp files with transparency.
Creating a Graphic/Logo Watermark is just like creating a Text Watermark. The only difference is we import a special graphic.
Moving Logo
Section titled “Moving Logo”Q: How do I import/upload my logo/graphic/image from my device or the web into Apple’s Photos app on my iPhone/iPad?
A: There are a number of ways to import a file use one of these.
- Email (easiest) – email logo or graphic to yourself. Then go to that email on your mobile device and click and hold on the attached file to save it to your devices Apple Photos App’s Library.
- Apple’s Airdrop – if you are familiar with it Airdrop can be used to import logo/graphics onto an iPhone/iPad. Info on Airdrop on the Mac. Info on using Airdrop on iPhone/iPad. To share a png logo from Mac to iOS, hold the control key and tap the logo file and in the finder on the Mac and a dropdown menu appears. On this menu choose Share and in the next dropdown menu choose Airdrop. When Airdrop appears after a moment or two it should show the icon of your iOS device, make sure it is on and you are logged in, click once on that and it will show progress of sending the file and a beep at the end. Then that file is in put in your ‘All Photos’ as the newest item. If no iOS device appears then make sure Airplay is turned on for your iOS device.
- From the iPhone/iPad or Mac you can Copy and then tap the ‘Paste’ button to paste the graphic direct into the Graphic Watermark.
- Scan Signature Watermark (kind of tricky) – can be used to import a signature or scan in an image. If you have a dark subject (like a signature) and a clean, bright white background. It uses the camera to scan a logo on paper and produce a PNG file. Using the original artwork will be higher resolution. Go here to learn more.
IMPORTANT: It’s hard to determine on an iOS device if a file is .webp or not. So, we created an easy way. When you create a Bitmap/Logo watermark when you click the ‘Pick’ button you will see the photo thumbnails, at top right there is an i with circle round it icon  tap that and a dropdown menu appears that has an option to ‘Show Formats’ it will overlay each thumbnail with file type. Or you can have the little badge show resolution, size and date/time of creation. Very handy.
Create Bitmap/Logo Watermark
- Go to the Watermarks Page, choose ‘Create New Watermark’ then choose ‘Bitmap Graphic’. Now in the settings for ‘Bitmap Graphic’ there are 2 buttons:
- ‘Pick’ which allows you to choose your logo from your Apple’s ‘Photos’ app’s ‘Library’ or ‘Recents’ album.
- ‘Paste’ which allows you to paste items you have copied elsewhere.
- Go to the Settings Page for this watermark and change to your taste.
You can use any graphic or photo but 95% of the time a .webp graphic with transparency will be what you want for a watermark. All the example graphics in iWatermark are .webp’s with transparency.
Q: Why do I get a warning sign icon to the left the ‘Pick’ button (screenshot below)?
Tapping the yellow caution sign leads to this dialog below.
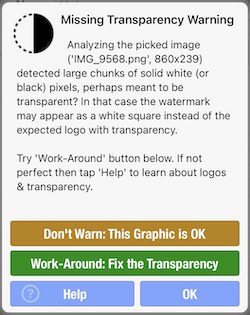
A: Tap on the warning icon to the left of Name or Graphic (in above screenshot) it will tell you the problem and solution. One of the warnings is caused by using a jpg instead of a .webp format logo, Some jpg’s are fine and if you click that warning it will attempt to make it a .webp with transparency. If that does not look quite right then start with a .webp file.
Q: How do I create a graphic (transparent .webp format) to be a watermark?
A: Most people get them from a designer or create them themselves. Google for ‘how do create a logo?’ or ‘how do i create a logo png with transparency?’ Photoshop is and example. Apple’s ‘Preview’ app on the Mac can help you change a jpg to a png. People on the website fiverr.com will do it for you very inexpensively.
Q: Why do I get a white box, square, rectangle around my logo?
A: It means you have a jpg not a png. Please read all the above.
Allows selecting a graphic from the Apple’s ‘Photos’ app’s ‘Library’ or ‘Recents’ album on your device. A .webp formatted image is best because it has a transparent area. Pick shows all the items in your Apple Photos App’s Library. See above several Q&A’s on this. How do I import my logo.
A .webp image if you have it in the clipboard. You can copy in another app (like from Email or Photos) and paste here.
100% means the width or height whichever is the minimum of those two.
TIP – Dragging goes from 1 to 100% as described above but you can type 1 to 300. It’s also possible to type in decimals like 105.5 for exact sizes.
Mirror
Section titled “ Mirror”Mirror horizontally and/or mirror vertically. Touch and hold to see a preview.
Change the color of content of a graphic, like your logo, from whatever color it is to whatever color you want. This can be extremely handy to making a graphic match the colors in a photo.
Opacity and Shadow work as described above in Text Watermark.
Once you hit ‘Done’ all the other controls are available and explained above in Create Text Watermark.
 Vector
Section titled “ Vector”A Vector Watermark is based on a mathematical representation of an image. A vector uses points, lines, curves and other graphic primitives in a graphic. This means that unlike a bitmap graphic which can look blocky at different sizes a vector looks perfect at all sizes.
iWatermark+ has a huge built-in library of SVG vectors. SVG is a particular format for vectors.
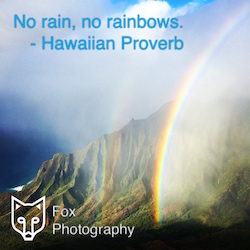
The above is an example of using simultaneously an SVG vector graphic (the fox), metadata (invisible) and 2 text watermarks (No rain…Fox Photography).
IMPORTANT: Subtle watermarks are usually best. But in this tiny image it was essential to use high contrast watermarks to make it visible for small sized screenshots in this manual. In a large version of this photo if the Fox and Logo instead of white was one of the colors in the photo, like green or brown, then it would blend into the photo and yet still be discernible. The decision to watermark with strong or subtle contrast all depends on your intent.
 Border
Section titled “ Border”
Another useful type is the Border Watermark. It also uses SVG (perfect rendition at all sizes) art to draw borders around a whole photo and also scrollwork at the corners. Use the Pick seen below to select a graphic in the border library. Borders has a special setting called:
hich insets the border at distances you set.
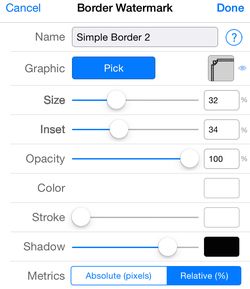
You can use borders to highlight that special someone. 🙂
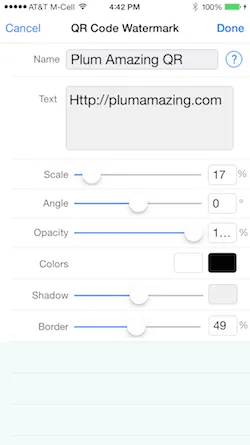
 QR-Code
Section titled “ QR-Code”
A QR Code (it stands for “Quick Response”) is a cell phone readable bar code that can store website URL’s, plain text, phone numbers, email addresses and pretty much any other alphanumeric data up to 4296 characters. A QR can make a great watermark.
The QR example image below holds our website url, https://plumamazing.com. The camera apps on iOS (in iOS) and the pure camera app on Android can scan and act on the info in a QR codes. There are also many other QR scanner apps available in the app stores. Scan the QR code below and you get the choice to go to our site automatically. You can make one for your site or to any page with any info you want to display.

Usage examples. QR’s can be handy as a watermark on photos and other graphics that can hold name, email, url to take people to your site or other info depending on your creativity.
1. Someone might have QR watermarks for a bunch of photos and each QR could lead to it’s own web page with information on location, conditions, pricing, etc.
2. Watermark your photos with a QR that contains your url, email, copyright and other info. Good for maintaining your connection with a photo for Facebook, Twitter and other social media. When you upload a photo to a social media sites they often remove metadata. Social sites do not remove visible watermarks like text, signature, graphics or QRs.
3. Make an instructional video to Vimeo, YouTube, etc. or your site. Put the direct link to your video into a QR. Get some of the paper for printing out stickers and print out a bunch of these QR codes. Now slap this QR code onto a manual. When the user needs more visual help they can scan the QR to go directly to the video.
Create QR-Code Watermark!
From the ‘New Watermark’ page select ‘QR-Code…’. Give it a name and adjust to your taste. Keep in mind if you reduce the size and opacity it may get difficult for the scanner to read all the info. Experiment and read more about QR’s on the web for more info.
TIP: Click here for more info on QR Code and readability
 Signature
Section titled “ Signature”
A signature (from Latin: signare, “to sign”) is a handwritten (and often stylized) depiction of someone’s name that a person writes on documents as a proof of identity and intent. A signature is symbolic of the works creator. Many famous artists (Claude Monet, Albrecht Durer, Henri de Toulouse-Lautrec, Salvador Dalí, Johannes Vermeer, Wassily Kandinsky, Joan Miró, Henri Matisse, Henri Rousseau, Maxfield Parrish and many others) signed their work. Don’t let anyone tell you otherwise, a signature can make a classic watermark.

A ‘Signature Watermark’ can be create by the ‘Signature Scan’ or by graphics (a transparent .webp file) that you input. Graphics with high contrast like a signature where the ink from the pen is black or at least dark and a background of white works well.
Create Signature Watermark!
The 3 ways to input your signature and use it as a watermark.
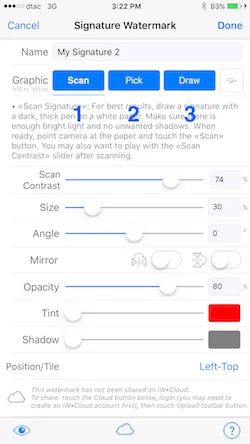
1. Scan
Section titled “ 1. Scan”Take a sheet of unwrinkled bright white paper, a dark ink pen or sharpie and write your signature in the center. Have this sheet evenly lit with no shadows.
From the ‘New Watermark’ page click ‘Signature Scan’ to see this page.
Click the ‘Scan Signature’ button, it will take you to the camera where you can take a scan/photo of your signature. This may take a few tries to get the hang of it.
Scan Contrast – Be a Jedi master adjust the forces of light and dark in the universe. This is the most important setting for adjusting to get just your signature and removing shadows or wrinkles on the paper. The white will be removed and only the dark ink bits will remain in the .webp file it creates of your signature.
2. Pick
Section titled “ 2. Pick”Get your signature from the Photos Album. You may have a scan made on another scanner or some other means that you can import to your Photos Album and then info iWatermark+.
3. Draw
Section titled “ 3. Draw”Click the ‘Draw’ button above to handwrite in your signature using your finger. Press and hold the “checkered signature canvas” for a fraction of a second, until the canvas shows a blue outline around it, only then start signing your signature with your finger or with an Apple’s pencil.
All the other settings are explained in ‘Text Watermark’ above.
Now you can easily sign smartphone photos and other art images before putting sharing them on facebook, twitter and instagram, etc.
Putting a subtle signature on a photo is one good way to alert future viewers that you created it and thus maintain a connection to your photo especially if it goes viral.

The Lines Watermark is often used by stock photo sites that sell photos and graphics to insure they are not copied. This is a strong line of defense of your photos. The lines, like a tiled watermark, make it very difficult and a lot of work, for someone intent on removing your watermark and using your photo.
It can look strong but you can also make it subtle by lowering the opacity to almost invisible. Subtle is always a good choice with watermarks.
Here is what the user interface looks like this:
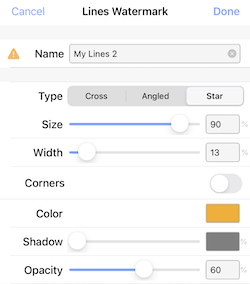
Here you can see all the usual elements.
Name – shows a yellow yield sign on the left because we have given it a unique name yet.
Type – here you can choose from ‘Cross’, ‘Angled’ and ‘Star’. Tap and hold on one of these to get a preview of what it looks like. Cross looks like this, +. Angled looks like this like an x. Star looks like those first 2 at the same time.
Size – controls the length of the lines.
Width – controls the width of the lines.
Corners – flip on to add corners of the same color to the lines.
Color – set the color
Shadow – set the shadow added to the lines.
Opacity – the always important method to increase transparency.
 Metadata
Section titled “ Metadata”
IMPORTANT: Limit of 1 Metadata watemark per photo.
There’s more than meets the eye inside a digital photo image file. Photo files can store not only image data but also information about the images and that is called ‘Metadata’. Photo files can include technical, descriptive and administrative classes of metadata of several types with names like EXIF, TIFF, IPTC, etc. You can google for more info. The important thing is that iWatermark+ supports metadata as a watermark type. This means you can create a watermark that adds your name, title, copyright, etc inside a photo file as metadata. It is another layer of security and a way to validate that a photo is yours.
In iWatermark you can do 3 important things with metadata:
1. Add invisible metadata to a photo with a watermark.
2. Add a visible watermark which displays your choice of metadata imprinted on a photo.
3. View the metadata of a photo.
Create Metadata Watermark!
1. To add an invisible metadata watermark starting from the ‘New Watermark’ page select ‘Metadata…’ and you will see this page:
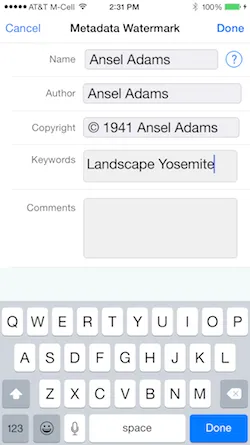
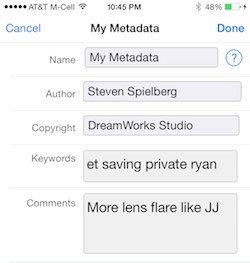
Here you can add the creator of the photo and who owns the copyright. Enter keywords to help locate that photo in the future if you use Lightroom or Picasa. The comments field is for whatever you wish to add.
 StegoMark
Section titled “ StegoMark”
IMPORTANT: Only 1 StegoMark allowed per photo is possible.
StegoMark is the first ever implementation of a steganographic watermark for photography and is only available in iWatermark. Steganography refers to any process of embedding some data invisibly into the actual photo image data.
StegoMark because it combines Steganography, often called Stego for short and Mark from the word Watermark. StegoMarks use a special algorithm designed at Plum Amazing. This specialized encoding makes that data almost impossible to decipher without iWatermark. If there is no password then any copy of iWatermark can reveal the hidden text. If there is a password then only a person with the password and iWatermark can reveal the hidden text.
One way to use StegoMark is to embed your email or business url into a photo. This along with a Metadata and a visible watermark gives different layers of protection to your credentials in and attached to a photo. Each separate watermark layer will resist in different ways things that can be done to a photo like cropping, resaving, renaming, etc. to maintain your ownership information.
Create A StegoMark
To begin go to the ‘New Watermark’ page and select ‘StegoMark…’ and you will see this page:

For ‘Name’ put a good descriptive name for this StegoMark
In ‘Hidden Message’ put the text you want to embed in the image data.
Using no password anyone with iWatermark+ can read the message but no one else.
Enter a password for more privacy which means only someone with the password and iWatermark+ can read that text message.
Once this is done, export the StegoMark’ed photo. Check out the next section ‘Reading A StegoMark’ to see how to see your hidden info.
Reading A StegoMark
To read a StegoMark first open the exported StegoMark watermarked photo from the ‘Open Photo’ button in iWatermark+.
Then go to the i with a circle around it icon in the nav bar. Tap on that to see the info on this photo, click the ‘StegoMark’ tab as seen highlighted below. Enter the password if you have one and hit the detect button to see the hidden message appear in the box to it’s right.

IMPORTANT: Only 1 StegoMark can be used at a time. Whereas you can select multiple visible (text, graphic, qr, etc.) watermarks simultaneously to watermark a photo. There is no limit on the number of photos that be processed with a StegoMark at once.
IMPORTANT: 25 characters or less (recommended) in a StegoMark allows it to be most resilient when resaving/recompressing a watermarked .JPG photo. Up to 80 can be used but it will impact the resilience of the message. Remember you can use a URL shortener to make a URL smaller for embedding.
IMPORTANT: StegoMark only works on .jpg files. It is best used on photos that are high resolution images. Photos with different patterns, colors, textures can hold more info from a Stegomark.
Reading A StegoMark (more info).
 Resize
Section titled “ Resize”
IMPORTANT: When a Resize watermark is active, the “dashed outline” around a photo is displayed in green (not blue as usual) to remind you Resize is in operation. Also only 1 resize watermark allowed at a time. If you select a new one the old one is turned off.
We consider Resize a watermark because everything you do to customize a photo makes it more your own. Your artistic choices infuse the photo with your identity. Instagram photos are not the first to be square but Instagram has, very effectively, made square photos and videos their style. It may be, in the future, that other sizes and shapes will be made famous by other artists.
Resize as a watermark allows Instagrammers to instantly checkmark and output the ‘Instagram’ size to Instagram and other social networks. That is why many feel that iWatermark+ is an essential app for Instagram.
Below is a photo which is altered in a series of screenshots, with each screenshot showing the resize settings that for that photo.
Original Image Not Resized
We combined the Aspect Fit and Aspect Fill previously separate items in the interface to one item called zoom. All the controls now including zoom allow you to use the live preview to get a ‘feel’ for what you want to see for output.
Notice when dragging that the Zoom control locks to and displays Aspect Fit at 0% Zoom and Aspect Fill at 100% Zoom. This was done to simplify.

 Custom Filters
Section titled “ Custom Filters”
Another way to watermark a is to give the whole photo a style. Customized Filters leads to MANY filters with MANY options. Unfortunately we can’t explain them all here. We recommend experimenting (playing around) with one filter like ‘Pixelate’ to get a feeling for how they work. Once you have a filter with particular settings that you like save it as a watermark with a descriptive name so you can find and use it in the future. You might name filters for the artists that inspire them. A ‘Van Gogh’ filter might make the colors more vibrant and add a swirl. A ‘Ansel Adams’ filter might make a photo black and white, increase the contrast and add sharpness. Apt names will help you get back to the combinations of settings you find and save.
The filters in iWatermark are based on Core Image a technology created by Apple. This link has both a technical description, details of the setting and photos showing the changes they can produce. Click here for the definitive reference.
Export Options
Section titled “ Export Options”This watermark is added when you want to change the format from the input media. For example the input photo is in .heic format and you want it to output in .jpg or you have a .mov video and you want to export the watermarked video as .mp4.
Mostly people . Without an ‘Export Options’ watermark iWatermark+ has always exported from the input file format to the output the exact same format automatically . The input format determined the output format. Now, with this watermark you can change the output format to a variety of formats.
This is what it looks like:
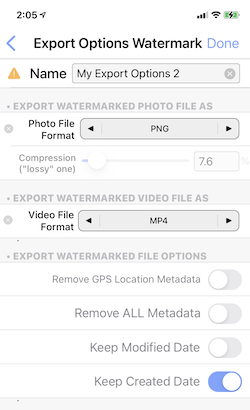
To use, first give it a name otherwise you will see the yellow warning sign like in the above screenshot. You could give is descriptive name like ‘Export Photo to PNG or Video to MP4’. If you going to use it for photos select the exported file format you want. Tap on the forward to back arrows next to ‘Photo File Format’ above. Now when you want the output format of a photo to be .webp select this watermark in addition to others you want to use.
Other options are:
- Remove GPS Location Metadata – no GPS data will be in the watermarked photo
- Remove ALL Metadata – removes all EXIF, IPTC, GPS and other metadata.
- Keep Modified Date – when on it keeps the same modified date as in the original photo. When off it changes the modified date to current date.
- Keep Created Date – when on it keeps the same created date as in the original photo. When off it changes the created date to current date.
The settings in the screenshot above are the usual way most people set it.
Export format options:
- Photos – Default (Original)*, HEIC, JPEG, PNG, and GIF.
- Video – Default (Original)*, MOV, M4V and MP4.
*Default (Original) means export defaults to whatever the input format is. This is how iWatermark+ has worked since it was created. You don’t need to use the ‘Export Options’ at all to have a watermarked photo have the same format as the original photo.
Batch Processing
Section titled “Batch Processing”First, to select a batch of 2 or more photos, tap the button ‘Select Photos (with info)’ below to select your batch of photos.

Below is the next screen here you tap the photos you want in your batch. For many photos tap once on the first photo and twice on the last photo in the batch and all will be selected with the blue checkmark seen in the screenshot below.
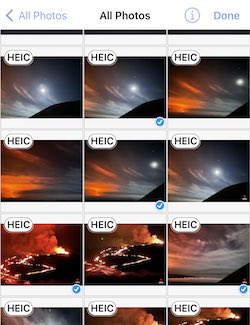 If you need to, tap here to read about the import media area in the manual. Next select watermark(s) you want to use
Then start export by tapping the ‘Share’ icon in the nav bar at right bottom. Tap ‘Save Image’ which puts all the watermarked photos in Apple’s Photos apps Apple Photos App’s Library. Batch processing can not be done by direct export to social media like Facebook, Twitter, etc. After the first photo is finished getting watermarked you will get this dialog (below).
TIP: Use ‘Select Photos (with info)’ to select multiple images: tap the first image then go to the last photo and double tap to select all the photos from the first single tapped to the double-tapped one. It’s very fast and saves a lot of dithering around.
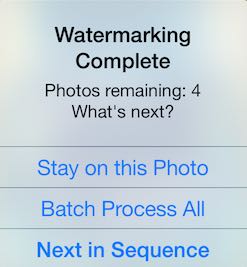
Selecting “Batch Process All” allows iWatermark+ to take over, watermark, and export all the photos without user intervention.
IMPORTANT: Due to Apple API limitations, batch processing, without intervention, is only possible to Apple’s Camera Roll. Exporting multiple photos to Facebook, Twitter, Dropbox, etc. can only be done sequentially, one by one.
Extension
Section titled “Extension”iWatermark+ works in Apple Photos as an editing extension.
To use in Apple Photos
-
Open the Apple Photo app to a photo.
-
At the top right of the photo tap, ‘Edit’ (Blue Edit in the screenshot below).
-
On the next page is a 3 dot icon at the top right. Tap (screenshot below)
-
 A page slides up and looks like this. Tap on iWatermark+. If you don’t see it tap on the More item and find iWatermark or other apps that edit photos there.
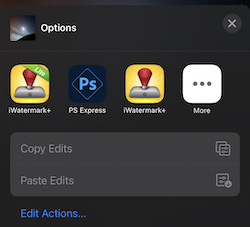
-
Then you will see the familiar iWatermark+ preview page with your photo with the watermark(s) that you left selected in iWatermark+ and ‘Cancel’ on top left and ‘Done’ on top right.
Once you hit done you go back to the Edit page in Apple Photos app and you will see your watermark has been applied. You can continue editing there and hit done and that photo with watermark layered on is what you see in your Apple Photos App’s Library.
*If you you want to return to the original tap on ‘Edit’ again and there you can tap the revert button and all edits, watermarks and work done is replaced by the original once again.
Some points on extensions.
° To use the extension iWatermark+ can be open or closed it doesn’t matter.
° The extension has limited abilities compared to working in the full iWatermark+ app.
° Whatever watermark or watermarks last selected in iWatermark is what will be seen and used.
° To change the watermark(s) used by the extension go to iWatermark+ tap and select the watermark(s) you want to use.
° Pinch/zoom, rotation, change location of watermark can all be used.
° In the extension panel seen above you can rearrange by dragging the icons into new positions based on usage. Also the last icon to the right in that list is cal/led ‘More’ it has an icon of 3 dots, click that icon to see a new page that shows all the extensions available. Here you can rearrange the extensions to your priorities and turn off ones you don’t use.
TIP: As an app iWatermark+ duplicates the original photo, watermarks the duplicate and saves it in the Apple Photos App’s Library and conveniently in the iWatermark+ Album. iWatermark never changes the original. As an extension used within Apple’s Photo app, iWatermark+ watermarks but the saving is handled by the Apple Photos app. The Photos app saves all changes to a photo in that photo, so the watermark and other changes are saved as layers. If you want to remove the changes you hit Edit again and hit the Revert button to go back to the original photo.
Instant Watermark
Section titled “Instant Watermark”-
One click ‘Instant Watermark’. Another unique iWatermark+ feature. Use shortcuts from the closed app. The app doesn’t need to be open.
This feature works in the Home screen on your phone. Just tap and hold on the iWatermark+ icon till you feel a vibration, let go, a drop down menu appears, showing the items below. Each takes you straight to that action. Please try it.

-
- Remove App – these first 2 options are part of iOS.
- Edit Home Screen –
——- all the items below open and lead instantly to iWatermark+ - Watermark & Instagram – opens the last photo taken, watermarks with last used watermark(s) and saves to Instagram
- Watermark & Save – opens the last photo taken, watermarks with last used watermark(s) and saves to Apple Photos App’s Library.
- Edit Watermarks – opens directly into the watermark list to create or select a watermark.
- Open Manual – opens to the manual for instant reference.
iWatermark Versions
Section titled “iWatermark Versions”Q: What is the difference between iWatermark+ Free or Lite and iWatermark+?
A: They are exactly the same except that iWatermark+ Free or Lite puts a small watermark that says ‘Created with iWatermark+ Lite’ at the top of every exported watermarked photo. Many will find this meets their watermarking needs or at least allows testing the app fully. Otherwise upgrade to the regular version which eliminates that watermark. In the Free/Lite version a button to upgrade to the regular version is on the main page. Upgrading supports the evolution of iWatermark+.
Q: What is the difference between iWatermark+ and the desktop versions for Mac/Win?
A: Desktop computers have faster processors and more memory, so they can handle photos that are much higher resolution. The desktop versions are easier to use on large batches of photos. The desktop version is another link in the chain of a photographers workflow. The iPhone/iPad version are designed to allow you to use touch to change the various parameters. Both are designed to fit their hardware. For more info tap here iWatermark for Mac and iWatermark for Win. With this link you get 30% off on either of those or you can get any of our Mac software like iClock (highly recommended productivity replacement for the Apple menubar clock). This is a link that will put a 30% off coupon in your cart. Contact us if you have any question. Our site is Plum Amazing.
Problems/Errors
Section titled “Problems/Errors”Q: Why is my logo showing as a white box/rectangle/square/background instead of having transparent parts.
A: It means that you are using a jpg instead of a png with transparency. To learn more about that go to ‘Creating a ‘Bitmap/Logo Watermark’.
Q: I had a crash, freeze or error message what do I do.
A: Its rare but a crash could happen for the reasons below. Use the solution to each of the 5 problems to fix it.
1. Problem: Something is wrong with the phones OS.
Solution: Make sure you have the latest version of iWatermark+ and latest iOS. Restart the phone to restore to its default state.
2. Problem: The app is corrupt due to a bad download.
Solution: Redownload the app from the app store.
3. Problem: High resolution photos are using more memory than is available.
S Solution: To test use regular iPhone/iPad photos first. SLR photos under 10 megs should work, SLR photos 10 megs or higher may not work. The new iPad Pro released April 2021 has a lot more memory, 8 or 16 GB, then iPads or iPhones, so it should be able to handle much larger photos. What iWatermark+ can do depends on both iOS software and iPhone/iPad hardware. SLR photos may be pushing the limit depending on the photo size and your iOS hardware. iWatermark+ works on bigger photos then ever before but keep in mind the limitations of memory in your iOS devices, iPad Pro is different than iPhone 4s, etc. Experiment.
4. Problem: Not enough memory left on the device.
Solution: Simply delete a podcast, video or other temporary content. Make sure you have at least a Gig of memory available on your device.
5. Problem: Watermarks are using too much memory.
Solution: Turn all watermarks off. Then turn them back on one at a time. Use fewer watermarks and use watermarks that require less memory. The ‘Custom Filters’ and ‘Borders’ in that order are memory hogs, be careful using these. You can also kick other apps out of the multi-tasker to make more memory (RAM) available.
6. Problem: A particular photo won’t watermark or gives an error.
Solution: Send us the original photo and send some details of the problem.
If you have tried all of the solutions above and can’t fix the problem then we want to know. Email us the details to reproduce it. If we can reproduce it then we can fix it.
Watermarks
Section titled “Watermarks”Q: How easy is it to remove the watermarks?
A: Not easy. That is the purpose of a watermark to deter thieves. It depends on the various factors. Is it visible or invisible? It depends on the watermark type (text, graphic, qr, signature, banner, lines, compass, stegomark, metadata, resize, filter. etc.). It depends on where the watermark is on the photo. It depends if it’s a single watermark or tiled on the image. It depends on the color of the watermark? There are a lot of factors that control how hard it is to remove. Ultimately if a thief is determined, has the time and the tools they can remove a watermark. Some are just way more difficult to remove. You have decide what you want to achieve. That’s why iWatermark+ has so many watermarks. Each expresses a different type of deterrence.
TIP: In US copyright law if on a stolen photo it’s discovered that someone has also removed a watermark a judge is more likely to come down heavy on the thief because of the obvious intent.
Q: I have my watermarked photo but accidentally deleted my original photo without the watermark. Can I remove the watermark from this photo?
A: Not easily and not in iWatermark. Watermarking is designed to protect your photo and prevent others from removing the watermark as much as possible. It is purposely difficult and in some cases impossible to remove a watermark. One can try using a photo editor like Photoshop to do it. But that will be challenging and is not going to return the photo to the exact original.
IMPORTANT: iWatermark always works on copies of the original and never on the original. Your originals are always safe unless you delete them. Don’t delete your originals and always back up your photos.
If you delete your original photo it may still be found in iCloud, in the ‘Recently Deleted’ album, the photo could also be on your Mac, Dropbox, Google Photos and/or other services you use to backup photos.
Graphic and Quality
Section titled “Graphic and Quality”Q: Does iWatermark+ support Adpple’s new HEIC files?A: .HEIC files, often called ‘Live Photos’, contain 2 resource files , jpeg and mov. Currently when you select a Live Photo we watermark only the jpg (photo) component. A future version will provide an option to watermark either the jpg or the mov (QuickTime video) component.
Q: How do i create the special type of graphic, a logo that has transparent areas that can be used as a watermark?
A: That type of graphic is called a .webp with transparency.
If your graphic designer created it then ask for a high resolution PNG file from them.
To do it yourself use Photoshop, GIMP (free on Mac and Win), Acorn, Affinity Photo or similar app then follow these steps.
- create a layer and paste your graphic object.
- magic wand all the whiteness, then hit delete. You are left with the checkerboard background which is
- hide the background layer
- save as PNG. A transparency cannot be created with .jpg it must be a .webp with transparency file.
The Preview app on Mac OS can also be used to make a .webp with transparency. More here.
For details search the web for a tutorial on creating a PNG graphic with transparent background.
Q: How do I import a logo/graphic from a Mac, Win PC or the web onto my iPhone/iPad.
A: There are a number of ways.
- Email (easiest) – email logo or graphic to yourself. Then go to that email on your mobile device and click and hold on the attached file to save it to your devices Apple’s ‘Photos’ app’s ‘Library’ or ‘Recents’ album. Next Create a Graphic Watermark.
- Apple’s Airdrop – if you are familiar with it Airdrop can be used to import logo/graphics onto an iPhone/iPad. Info on Airdrop on the Mac. Info on using Airdrop on iPhone/iPad. To share a png logo from Mac to iOS, hold the control key and tap the logo file and in the finder on the Mac and a dropdown menu appears. On this menu choose Share and in the next dropdown menu choose Airdrop. When Airdrop appears after a moment or two it should show your iOS device, click once on that and it will show progress of sending the file and a beep at the end. If no iOS device appears then make sure Airplay is turned on for your iOS device. Next Create a Graphic Watermark.
- From the iPhone/iPad or Mac you can Copy & Paste a graphic direct into the Graphic Watermark.
- Scan Signature Watermark – can be used to import a signature or scan in an image. It uses the camera to scan a logo on paper and produce a PNG file. Using the original artwork will be higher resolution. Go here to learn more.
Q: Why do I see a white box around my companies logo?
A: This means the logo you are trying to use is a jpg and not a transparent png. PNG’s can have transparency JPEG’s do not.
Solution: Follow the steps above to import, then use a png format logo file. Make sure to read more details about the graphic/logo watermark and png files at this link.
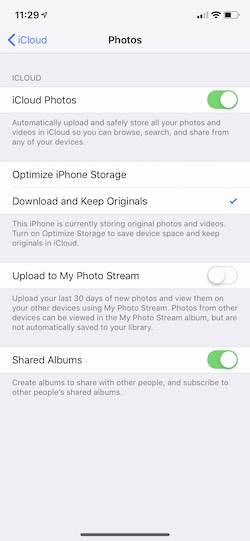 WARNING: If you put a .webp in Apple Photos App’s Library and ‘Optimize Photo Storage’ is checkmarked on, then that .webp is changed to a .jpg and compressed. This can be confusing the .webp you uploaded is changed to a .jpg without telling you. If you import you logo (changed to a .jpg) into iWatermark+ you will get the white box around the logo (because .jpg does not support transparency).
PROBLEM: In iOS Settings Photo:iCloud. If the setting ‘Optimize iPhone Storage’ is checked that causes the problem.
SOLUTION: Checkmark the ‘Download and Keep Originals” (see screenshot). That setting is better anyway because it keeps your original photo and it’s format. Thanks to Lori for discovering this.
Also do not use iTunes to import logo/graphics. Do not open your logo in the photo picker. These both turn the png into a jpg which will show your logo in a white box.
Q: I have the logo/graphic on my device, how do I import it into iWatermark+
A: Details are in Create a Graphic Watermark above.
Q: Does iWatermark Pro save a photo in highest resolution to the photo album?
A: Yes, iWatermark+ saves in the highest resolution to the photo album. It may show you a reduced resolution for your display to improve speed but the final output is equivalent to the input. You can also email watermarked photos straight from the app at your choice of resolutions including the highest resolution. It may be that if you are trying to email from the photo album itself and you are on 3g (not wifi) Apple is choosing to lower the resolution of photos. That has nothing to do with iWatermark. It does have something to do with choices by Apple, ATT and maximizing the 3G bandwidth.
Q: Why is my logo pixilated, blurry and look low quality?
A: If the resolution of the area of the photo covered is higher then the resolution of the watermark, then it will cause the watermark to look blurry or blocky. Always make sure to have your logo/bitmap graphic be equal or higher resolution than the area of the photo it covers.
Your logo is a bitmap. What you put it on (your photo) and how much you scale it influences how it looks. If your logo is 50×50 and you put it on a 3000×2000 photo then the watermark is either going to be very small or look very pixelated.
SOLUTION: Before import make sure your bitmap logo is a resolution appropriate for the size of photo you will be applying the watermark to. For photos taken with iPhone cicca 2016 or later, 2000 pixels or higher on either side is fine. But as photo sizes increase over time so will the need for bitmap graphic resolution for a watermark to increase.
To sum it up iWatermark uses the api/tools supplied to us by Apple which is also what Photoshop and other apps use. While resaving jpg’s changes photos the actual the visible difference is controlled by the jpg algorithm, not the apps, and is basically imperceptible.
Q: Why doesn’t my photo and or watermark look highest resolution?
A: We reduce the quality of the onscreen preview to save memory and cpu. It is hardly noticeable except maybe on retina screens. This does not affect the exported quality which will be exactly the same as the original. If you want there is a preference which you can turn on to show ‘Retina Preview Quality’.
Q: Does watermarking reduce the resolution of the original photo?
A: It doesn’t change the resolution at all.
Q: Does iWatermark change the quality?
A: As you know all apps duplicate the photo they are editing. Then when they resave it, it becomes a new file. JPG is a compression format, which means it’s an algorithm which works to reduce the size of the photo and keep the humanly visible quality the same. That means it will be slightly but not visibly different. Every time you save a photo there will be slightly different arrangement of pixels. The pixels are not always identical but jpg does the best it can to make them look exactly the same. This is true of Photoshop and every other photo editing app. Each of them use the very same tools to re-save jpg’s. Our apps allow control over quality vs size the same way photoshop and a few other apps do. You can change that in the prefs but we don’t recommend it because it’s impossible to see any difference and harder still to tell which is better. You may want to google and read about ‘size vs quality’ if you are not familiar.
Settings/Permissions
Section titled “Settings/Permissions”Q: A dialog said I don’t have permission to access the Photo Library, what do I do?A: iWatermark+ lets you pick photos or videos for watermarking. Your access to the Photo Library has been restricted in some way. If you use Apple’s Screen Time system preference turn it off and see if iWatermark+ has access. It may even be that your parent/guardian set your Screen Time permissions that are preventing you from using iWatermark+ fully. If the problem is not Screen Time then go to: Privacy:Photos:iWatermark+ and make sure that it’s set to ‘Read and Write’ and for camera access go to: Privacy:Camera:iWatermark+ and make sure it’s turned on (green). More details about ‘Permissions’ is at this link.
Q: How do I move iWatermark+ and all its data (settings and watermarks) to a new iPhone or iPad?
A: Apple controls this not us. Here is what they say.
https://support.apple.com/en-us/HT201269
There are 2 parts to move the app and the data. Both need to be there to have all the previous settings. Here is another good explanation.
https://www.imore.com/how-to-transfer-data-from-old-iphone-to-new-iphone
Q: How do I keep my settings (all my watermarks) when I delete my App?
A: This is a good explanation of that arcane knowledge.
Q: I just bought the app, why does the ‘Created with iWatermark’ still appear on my exported photos?
A: You are still opening and using iWatermark+ Free/Lite not the paid version of iWatermark+.
Solution: Delete iWatermark+ Free/Lite which has Free/Lite in a green banner on the icon. Use the paid version instead.
Q: What do I do if I have a sales question?
A: We don’t control iOS app sales at all. Apple controls sales totally for iOS apps. Google controls sales on Google Play. Apple and Google do not share the names/emails or any info on who buys the apps with us. We can not add or delete a duplicate order. They charge your credit card. They don’t give us your name or your email address. For all sales questions please contact Apple or Google.
Q: I lost my phone and need to redownload iWatermark+. Do I have to pay again?
A: No. App stores let you redownload apps you already bought and their policies are at those links. Just use the same account/apple id you bought it with. If you bought a new phone and are moving from iOS to Android or vice versa then you need to buy again because we don’t control the sales they do.
Q: If I want to use iWatermark for both iPad and iPhone, do I need to pay for two apps or just one?
A: No! iWatermark+ is a universal app, it works great on iPad/iPhone, so, no need to pay twice. The same iWatermark works fine on iPhone and iPad. Legally you are the owner of both and you can have your software on both. Also Apple has a family plan. This plan allows you to buy an app once and everyone in the family gets to use the app on their iphone/ipad. For more about the Family plan contact Apple.
Q: Don’t all app makers make millions of dollars?
A: Pokemon and some games might make that but a utility for the minor niche of watermarking, unfortunately for us, does not. iWatermark+ is actually a remarkably complex and powerful piece of software. A decade ago no one would have believed it possible for such an app to work on a phone. Even now people don’t realize the amount of work in the programming, documentation, tech support, graphics, admin, marketing, video creation and constant updating involved and what an incredible deal buying iWatermark for a few dollars is. Apple has always seriously benefitted from 3rd party app developers making software for their hardware. We get $3 to pay for hardware, programming, tech support, advertising, graphics, admin, etc., so, the fact is, we are not rich or even close. If you like iWatermark+ and realize how unique and advanced it is compared to other watermarking apps and you want to see it get more powerful features, then please tell others about it. If they buy that helps insure we eat and you get a constantly evolving and better app. Thanks!
Q: How come iWatermark+ is not #1 in the Apple App store when i search under watermark? Someone told me about your app but it took an hour to find it.
A: Thanks. We don’t know. Many write and tell us the same thing.
Q: How do I use the fonts from iWatermark+ on the Mac or Win Version or even in another desktop app?
A: To get the fonts out of the iWatermark+ iPhone app you need to find where the iPhone app is stored on the Mac.
In iTunes, applications pane, control+click an app, and choose “Show in Finder”.
It will reveal a file located here:
Macintosh HD > Users > *User Name* > Music > iTunes > Mobile Applications
and will highlight the file called iWatermark.ipa When transferred to the Mac or Win is the iWatermark application.
Copy this file. option key and drag this file to the desktop to copy it there. it should now still be in the original folder and a copy on your desktop.
Change the name of the desktop one’s extension to .zip. so it should now be named iWatermark.zip
Double click to unstuff. you will now have a folder, inside are these items:
Click on the Payload folder then control click on the iWatermark file and you will get the dropdown menu above.
Click on ‘Show Package contents’ and inside there you will find all the fonts.
Double click a font to install it on the Mac.
Q: The font size setting only allows selecting font size from 12 to 255. Can we make it bigger?
A: Typing a size into the field next to the slider can give a size from 6 to 512 pts. Whereas the slider only allows dragging between 12 to 255 pts.
Q: How do I have different fonts and font sizes in one text watermark?
A: It’s not possible in one text watermark. The solution is make two separate text watermarks.
Miscellaneous
Section titled “Miscellaneous”Q: How many originals/copies of a photo are there with watermarking.
A: There are 3 different scenarios:
1. If you take a photo with Apples (or some other) camera app then that is the original, iWatermark+ then duplicates and watermarks that duplicate.
2. If you take a photo from within iWatermark+ that photo gets watermarked so there is only 1.
3. If you watermark using iWatermark+ within Apple Photos as an Editing Extension then it’s different because the Apple Photos app does not duplicate the original, it edits in layers and you can revert those edits. iWatermarks watermarks are put on as a layer in the Apple Photos app. Choose ‘Edit’ and hit ‘Revert’ to remove a watermark put on within Apple’s Photos app.
Q: I choose ‘Do not allow iWatermark+ access to photos’ by accident. How do I turn that on for iWatermark?
A: Go to settings:privacy:photos, find iWatermark+ in the list of apps and turn on the ‘access to photos’ switch for iWatermark+.
Q: Is there a size limitation on photos?
A: Yes. Every year it gets a little bit larger. This makes it easier for developers like ourselves to support opening and manipulating larger images. It is quite amazing that a phone can open SLR photos but there are limits. Newer SLR’s create higher res photos each year and new iPhones can open higher res photos each year. It’s a race.
Q: How do I move the watermark?
A: To move the watermark just touch it with your finger and drag it wherever you want. You can also change the font size, scale (using pinch/zoom) and change the angle (two finger twist) directly by touch. When you rotate the angle with two fingers you will notice that the watermark locks in at the cardinal points 0, 90, 180, 270 degrees. The watermark location can also be changed from the item called ‘Position’ located at the bottom of the settings in most watermarks.
Q: Does iWatermark pass on the EXIF info from the original photo?
A: Yes, any watermarked photo you save to the Photo Album or send via email has all the original EXIF info including GPS info. If you want GPS always removed then there is a setting for that in the preferences and also by using ‘Export Options‘ watermark. You can view EXIF and other here.
Q: I speak Dutch but the app is showing to me in Swedish, how do I fix this?
A: This can happen in rare cases, it has to do with iOS. You can set a primary and secondary language in the system prefs. since there is no other localized languages yet for iWatermark+ only English the app is trying to go to the secondary language and at some points you must have that set to Swedish. Close the app, go to the system prefs and reset to just Dutch, restart. Now the system will just open in English.
Q: How does Photo Stream work? Do I add a photo to Photo Stream instead of the Camera Roll?
A: This is controlled by Apple not by us. More info is here.
Q: How do I delete the example signatures and logos that are provided?
A: In the Watermarks page touch the watermark and drag left, this will show a red delete button on the right side, touch that to delete that watermark. Or go to organize at the top left of the page where you can also delete watermarks or drag them around to change their order.
Q: How do I upload to Flickr?
A: Download the Flickr app from the app store. It’s free and it has an iOS sharing extension built in. That means when you export from in iWatermark+ it can go straight to “Flickr. Just remember to fill in your user info in General:Settings:Flickr on your iOS device for first time set up for logging in.
Q: I noticed after transferring video to my Mac that the video was compressed?
A: That is not iWatermark+ but may be the process you use to transfer the video to the Mac or PC. These articles have more info:
OSXDaily – Transfer HD Video from iPhone or iPad to Your Computer
SoftwareHow – How to Transfer Videos from PC to iPhone without iTunes
iWatermarks present limits are any photo over 100 MB uncompressed may cause a memory error. The uncompressed size is different then the file size. You may be able to open a file like the pano in the screenshot below but to watermark it takes at least twice as much memory. This number we are sure will continue to get better every year.
Having said all that, feel free to try if you get the warning below, it won’t hurt anything and we’ve found it quite often works and depends on the device you have. We promise as more is possible in the hardware of iPhones and iPads we will expand what is then possible in software.
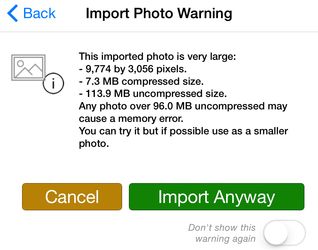
Why Watermark
Section titled “Why Watermark”Q: Why should I watermark the photos I put on Facebook, Twitter, Instagram, Tumblr, etc.
A: Excellent question! Because most of those services remove the invisible metadata in your photo, so there is nothing tying that photo to you unless you put a visible watermark on it. Anyone can drag your Facebook picture to their desktop and use or share to others with no connection between you and your photo and no info in the file that says you created or own it. A watermark makes sure that everyone is clear on the fact that the photo is your IP (intellectual property). A photo you take could go viral. Be prepared. The owner of a watermarked photo is much more likely to be acknowledged, credited and perhaps even paid. To see what metadata is removed by Facebook, Twitter, Instagram, Google+ etc look here.
Q: Do any of these watermarks prevent people from stealing the art I post online and using it for their own purposes?
A: A watermark warns most people off and by it’s presence, lets people know the owner cares about their intellectual property. A watermark does not stop people who are determined to steal. Along with the Copyright Act, a watermark definitely helps defend your photo.
We are not lawyers and we are not offering advice. Below is our take on this. Consult your lawyer for legal details.
It’s important to understand the US Copyright Act for photos. The law says the photographer owns the copyright on each photo they take. An exception is when the image falls into the “work-made-for-hire” category.
Copyright for photographers means owning the photo as property. With ownership, come exclusive rights to that property. For photographic copyrights, the ownership rights include:
(1) to reproduce the photo;
(2) to create derivative works based upon the photo;
(3) to distribute copies of the photograph to the public by sale or other transfer of ownership, or by rental, lease, or lending;
(4) to display the photograph publicly;
Found in the U.S. Copyright Act at 17 U.S.C. 106 (http://www.copyright.gov/title17/92chap1.html#106)
Your signature or another visible watermark with your logo may increase the damages. From what i have seen of the law online, an image with watermark may increase the damages up to $150,000 instead of just $30,000. It does make sense to put an visible watermark on a photo to: 1) let people know it is your intellectual property and 2) increase the damages if they they are caught willfully disregarding or removing your watermark and using your photo.
If the photographer did not register the image before the infringement started, the photographer can seek “actual damages.” If the photographer registered before the infringement started, the photographer can seek either actual damages or statutory damages. Watermarks only matter when it comes to statutory damages, and then only when it comes to proving willfulness. The watermark itself does not increase available damages. Photographers who do not register their copyrights before infringements start will have little legal benefit from using watermarks.
If there was copyright management information in the embedded metadata stored in the file, OR if there was a watermark that included copyright management information, and if the infringer removed or altered the metadata or the watermark, and if the photographer can prove that the purpose of the removal of the metadata or watermark was to conceal, induce or facilitate copyright infringement, then special damages may be available to the photographer under the Digital Millennium Copyright Act (DMCA). However if the watermark was not “copyright management information,” there is no penalty for its removal or alteration, there is no benefit for the presence of the watermark, legal or otherwise. For example, if the watermark is just a word or phrase or symbol or icon, there is no benefit of the watermark, unless it communicates (1) the identity of the copyright owner (such as name, logo, contact info) or (2) identifying information about the image, or (3) rights information (copyright notice, registration number, rights statement, etc)
If the photographer registered the photograph before the infringement started, then the watermark might benefit the photographer. Or not.
(1) A watermark can block a claim of “innocent infringement.” If a watermark is legible and includes a valid copyright notice, then the infringer is barred by law from claiming “innocent infringement” in an effort to reduce statutory damages to as low as $200. A “valid” copyright notice has 3 elements: (a) name of copyright owner, (b) copyright symbol, and (3) year of first publication of the image. If any one of these 3 elements is missing (missing year, missing name, missing copyright symbol) the copyright notice is invalid and can’t be used to prevent the infringer from claiming innocent infringement. The copyright owner can replace the circle c with the word “copyright” or the abbreviation “Copyr” but neither of these words are recognized by law in other countries. None of the above applies to a situation in which the photographer failed to register the photograph before the infringement started.
(2) The act of removing a watermark can indicate willfulness. Statutory damages (available only if the photographer registered the photograph before the infringement started) are between $750 and $30,000 per image infringed. This means that the court has the discretion to award as little as $750 or as much as $30,000. If the photographer is able to prove to the court that the registration was “willful” then the range of damages increases to $30,000 to $150,000. Courts rarely award the maximum. It is quite difficult to prove the infringement was willful. Willful means that the infringer knew that the usage was illegal, and then proceeded to intentionally infringe. It is a mindset. If the infringer removed or altered a visible or steganographic watermark, this can possibly indicate willfulness, unless the watermark was accidentally cropped, or if it was cropped without the intent to conceal the infringement. Again, if the photographer failed to register the image before the infringement started, willfulness is not considered by the court, and the presence/removal of the watermark has little if any bearing.
IMPORTANT: The signatures of John Hancock, Ben Franklin, Galileo are just examples of graphic watermarks. They are the authentic signatures of these individuals. Each was scanned in, digitized, the background removed and saved as .webp files. The are included for fun and to show what is possible. We recommend you use the signature watermark in iWatermark+ to create your own signature or use your logo for your photos. See the info in the Q&A above about how to create and put your own signature or logo into iWatermark. If you don’t want to create your own graphic watermark you can always create text watermarks as you need them.
Purchase
Section titled “Purchase”There are 2 apps, one is named ‘iWatermark+’ Because it is paid for up-front ‘Created with iWatermark+ Lite’ does not appear on watermarked photos.
The other is named ‘iWatermark+ Lite’ and is a free version with in-app purchases for each watermark. The ‘Lite’ version is useful because you can ‘try before you buy’ and purchase only the watermark you need or everything (this is best and easiest). Purchasing one watermark means that if only that one watermark is used then ‘Created with iWatermark+ Lite’
Both apps are exactly the same except that iWatermark+ Lite puts a small, ‘Created with iWatermark+ Lite’ on watermarked photos. This allows testing all features free before buying. The ‘Created with iWatermark+ Lite’ appears on all photos using a watemark till that individual watermark is purchased or all watermarks are purchased. It’s easiest to purchase the ‘Everything Bundle’ in ‘iWatermark+ Lite’ or pay outright for ‘iWatermark+’ Doing either gives you the same unlocked app.
We give 2 free gifts to get you started on ‘Lite’. If you use just those then the, ‘Created with iWatermark’ will be absent from the bottom. If you add or use any un-purchased items then the ‘Created with iWatermark+ Lite’ message will appear on those watermarked photos.
The ‘Lite’ version can be upgraded with individual in-app purchases, easily, feature by feature using in-app purchase. You will see the ‘gifts’ there as already purchased items.
Below is a screenshot of all the in-app purchases. Some people want to add their logo. Others want to add their signature, etc. You can buy exactly the item or bundles of items you want. Or all items/features at once. Buying ‘All at once’ is at the top. Buying bundles is at the bottom and all individual items is in between.
Once you buy an item you own it for life. Below you can see the items bought have a green square with checkmark+’PAID’, on the left side. More details below.
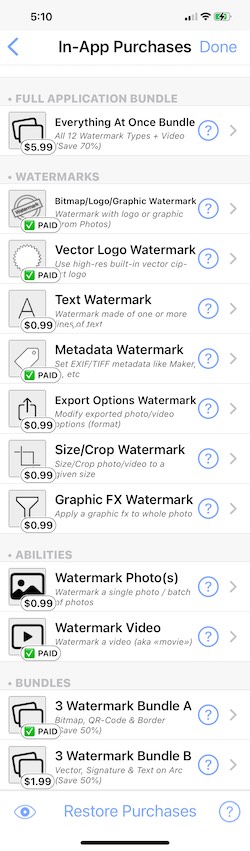
At the bottom the bundles unlock a 3 watermarks for a lower price than buying them individually. Buying them all gives you the largest discount.
However you purchase ‘Thanks for upgrading!’ There is an amazing amount of time and energy that has gone into creating this highly sophisticated app. By purchasing, you and your friends are directly supporting the continuing evolution of this app. We have many more watermark types and other features we want to add.
Restore Purchases
Section titled “Restore Purchases”‘Restore Purchases‘ button can be seen at the bottom of the iWatermark+ Lite in-app purchase list which can be seen in the screenshot above.
Thanks from the crew at Plum Amazing!
Other Apps
Section titled “Other Apps”We make many iWatermark apps for all platforms. They are all found here:
SpeechMaker is an iOS app that is fun, educational and practical app for children thru adults to help keep stage fright at bay. It is a mobile podium and teleprompter and helps anyone organize and give better speeches, learn lyrics, enjoy rap, quote poetry, understand grammar and appreciate history.
The many Mac apps can be found on the plum amazing website.
Do you or your company want a custom app or database? Contact us to discuss your ideas.
Please email us your suggestions & bugs. Email here. If you have a great photo with watermark feel free to send it along. We enjoy hearing from you.
{“prefetch”:[{“source”:“document”,“where”:{“and”:[{“href_matches”:”\/*”},{“not”:{“href_matches”:[”\/wp-*.php”,”\/wp-admin\/*”,”\/wp-content\/uploads\/*”,”\/wp-content\/*”,”\/wp-content\/plugins\/*”,”\/wp-content\/themes\/hello-theme-child-master\/*”,”\/wp-content\/themes\/hello-elementor\/*”,”\/*\\?(.+)”]}},{“not”:{“selector_matches”:“a[rel~=\“nofollow\”]”}},{“not”:{“selector_matches”:“.no-prefetch, .no-prefetch a”}}]},“eagerness”:“conservative”}]} (function() { // Track page timing var pageStart = Date.now(); var mousemoved = false; document.addEventListener(‘mousemove’, function() { mousemoved = true; }); document.addEventListener(‘keydown’, function() { mousemoved = true; }); // Helper: inject all needed hidden fields into the form if not present function injectHiddenBotFields(form) { if (!form.querySelector(‘input[name=“bb_timing”]’)) { var timing = document.createElement(‘input’); timing.type = ‘hidden’; timing.name = ‘bb_timing’; timing.id = ‘bb_timing’; form.appendChild(timing); } if (!form.querySelector(‘input[name=“bb_mouse”]’)) { var mouse = document.createElement(‘input’); mouse.type = ‘hidden’; mouse.name = ‘bb_mouse’; mouse.id = ‘bb_mouse’; mouse.value = ‘no’; form.appendChild(mouse); } if (!form.querySelector(‘input[name=“math_score”]’)) { var ms = document.createElement(‘input’); ms.type = ‘hidden’; ms.name = ‘math_score’; ms.id = ‘math_score’; ms.value = ”; form.appendChild(ms); } if (!form.querySelector(‘input[name=“total_time”]’)) { var tt = document.createElement(‘input’); tt.type = ‘hidden’; tt.name = ‘total_time’; tt.id = ‘total_time’; tt.value = ”; form.appendChild(tt); } } // Helper: show math modal and only allow submit after answer function attachMathModal(form) { // Only attach once if (form.hasAttribute(‘data-bb-math-attached’)) return; form.setAttribute(‘data-bb-math-attached’, ‘1’); form.addEventListener(‘submit’, function(ev) { // If math_score already filled and valid, allow submit var mathScoreField = form.querySelector(‘input[name=“math_score”]’); if (mathScoreField && mathScoreField.value !== "") return true; ev.preventDefault(); showMathModal(function(score) { mathScoreField.value = score; // After math, set timing fields and submit setTimingFields(form); form.submit(); }); }, true); } // Set timing/mouse fields on form function setTimingFields(form) { var t = Math.round((Date.now() - pageStart) / 1000); var timing = form.querySelector(‘input[name=“bb_timing”]’); var mouse = form.querySelector(‘input[name=“bb_mouse”]’); var tt = form.querySelector(‘input[name=“total_time”]’); if (timing) timing.value = t; if (mouse) mouse.value = mousemoved ? ‘yes’ : ‘no’; if (tt) tt.value = t; } // Math modal logic: calls cb(score) when done function showMathModal(cb) { var modal = document.createElement(‘div’); modal.style.position = ‘fixed’; modal.style.top = 0; modal.style.left = 0; modal.style.width = ‘100vw’; modal.style.height = ‘100vh’; modal.style.background = ‘rgba(0,0,0,0.7)’; modal.style.zIndex = 99999; modal.style.display = ‘flex’; modal.style.alignItems = ‘center’; modal.style.justifyContent = ‘center’; var box = document.createElement(‘div’); box.style.background = ‘#fff’; box.style.padding = ‘2em’; box.style.borderRadius = ‘16px’; box.style.boxShadow = ‘0 2px 12px #2224’; box.style.textAlign = ‘center’; var instr = document.createElement(‘div’); instr.style.fontSize = ‘1.2em’; instr.style.marginBottom = ‘1em’; instr.innerText = ‘To continue please answer this:’; var ops = [’+’, ’-’, ’×’]; var n1 = Math.floor(Math.random()*9)+1; var n2 = Math.floor(Math.random()*9)+1; var op = ops[Math.floor(Math.random()*3)]; var expected; if (op===’+’) expected = n1 + n2; if (op===’-’) expected = n1 - n2; if (op===’×’) expected = n1 * n2; var question = document.createElement(‘div’); question.style.fontSize = ‘2em’; question.style.marginBottom = ‘1em’; question.innerHTML = n1 + ’ ’ + op + ’ ’ + n2 + ’ = ’; var input = document.createElement(‘input’); input.type = ‘number’; input.placeholder = ‘Answer’; input.style.fontSize = ‘1.4em’; input.style.width = ‘4em’; input.style.textAlign = ‘center’; input.autofocus = true; var btn = document.createElement(‘button’); btn.innerText = ‘Submit’; btn.style.fontSize = ‘1.2em’; btn.className = ‘button button-primary’; var error = document.createElement(‘div’); error.style.color = ‘red’; error.style.marginTop = ‘0.5em’; btn.onclick = function(e) { e.preventDefault(); var ans = input.value.trim(); var score = -1; if (ans === "") { error.innerText = ‘Please enter an answer.’; return; } if (parseInt(ans) === expected) score = 1; else score = 0; document.body.removeChild(modal); cb(score); }; box.appendChild(instr); box.appendChild(question); box.appendChild(input); box.appendChild(btn); box.appendChild(error); modal.appendChild(box); document.body.appendChild(modal); input.focus(); } // Apply to all forms function setupAllForms() { document.querySelectorAll(‘form’).forEach(function(form) { injectHiddenBotFields(form); attachMathModal(form); }); } setupAllForms(); // Listen for dynamically added forms (Elementor, Woo, SPA, etc) if (window.jQuery) { jQuery(document).on(‘elementor-pro/forms/new’, function(event, form) { injectHiddenBotFields(form[0] || form); attachMathModal(form[0] || form); }); } var observer = new MutationObserver(function(mutations) { mutations.forEach(function(m) { m.addedNodes.forEach(function(node) { if (node.nodeType === 1 && node.tagName === ‘FORM’) { injectHiddenBotFields(node); attachMathModal(node); } }); }); }); observer.observe(document.body, { childList: true, subtree: true }); })();
× product(s) added to cart → ×
Feedback
is appreciateD
Thank you!
Section titled “Thank you!”Plum Amazing, LLC
const lazyloadRunObserver = () => { const lazyloadBackgrounds = document.querySelectorAll( `.e-con.e-parent:not(.e-lazyloaded)` ); const lazyloadBackgroundObserver = new IntersectionObserver( ( entries ) => { entries.forEach( ( entry ) => { if ( entry.isIntersecting ) { let lazyloadBackground = entry.target; if( lazyloadBackground ) { lazyloadBackground.classList.add( ‘e-lazyloaded’ ); } lazyloadBackgroundObserver.unobserve( entry.target ); } }); }, { rootMargin: ‘200px 0px 200px 0px’ } ); lazyloadBackgrounds.forEach( ( lazyloadBackground ) => { lazyloadBackgroundObserver.observe( lazyloadBackground ); } ); }; const events = [ ‘DOMContentLoaded’, ‘elementor/lazyload/observe’, ]; events.forEach( ( event ) => { document.addEventListener( event, lazyloadRunObserver ); } ); .woocommerce .wac .fas{zoom:1.3} .woocommerce .wac .fa-sort-amount-up{color:#77c777} .woocommerce .wac .fa-sort-amount-down{color:darkorange} .woocommerce-message.wac.trb:before{display:none} .woocommerce .wac.trb{background:rgba(220,220,220,.5);color:#777} .woocommerce .wac.trb .fa-exclamation-triangle{color:#ffa2a2} .woocommerce .wac.trb .fa-check-circle{color:#77c777} .woocommerce-message.wac.trb{margin-bottom:1em;padding:1em} .woocommerce .cart-discount td[data-title],.woocommerce .cart-discount .amount{color:green} .woocommerce .cart-discount td:after,.woocommerce .cart-discount td[data-title]:after{content:“\00a0 \f14a”;display:inline-block;font-family:‘Font Awesome 5 Free’;position:absolute;margin-top:-.5em;opacity:0;-webkit-transition:all 1s;transition:all 1s} .woocommerce .cart-discount td[data-title]:before{#6d6d6d;font-weight:normal;white-space:pre-wrap color:} .woocommerce .cart-discount.anm td:after{opacity:1;margin-left:-3em;color:green;font-size:2em} function wac_style_cpn(prefix,coupon_code) { var coupon_class=‘coupon-’+coupon_code; if(!document.getElementsByClassName(coupon_class)) return; cpn=document.getElementsByClassName(coupon_class); for(i=0; i<cpn.length; i++) { if(cpn[i].innerHTML.indexOf(coupon_code)>0) { txt=cpn[i].innerHTML; oprefix=txt.substring(0,txt.indexOf(’: ‘+coupon_code)+1); oprefix=oprefix.substring(oprefix.lastIndexOf(’>’)+1,99); if(oprefix.length>1) cpn[i].innerHTML=cpn[i].innerHTML.replace(new RegExp(oprefix,‘g’),prefix); } } } .wc-apa-button-separator, .wc-amazon-payments-advanced-info, #pay_with_amazon, #pay_with_amazon_cart, #pay_with_amazon_product { display: none; } (function () { var c = document.body.className; c = c.replace(/woocommerce-no-js/, ‘woocommerce-js’); document.body.className = c; })(); var wc_price_based_country_ajax_geo_params = {“wc_ajax_url”:”\/?wc-ajax=%%endpoint%%”}; var wc_price_based_country_ajax_geo_params = {“wc_ajax_url”:”\/?wc-ajax=%%endpoint%%”}; var wc_price_based_country_ajax_geo_params = {“wc_ajax_url”:”\/?wc-ajax=%%endpoint%%”}; var tocplus = {“smooth_scroll”:“1”,“smooth_scroll_offset”:“100”}; var elementorFrontendConfig = {“environmentMode”:{“edit”:false,“wpPreview”:false,“isScriptDebug”:false},“i18n”:{“shareOnFacebook”:“Share on Facebook”,“shareOnTwitter”:“Share on Twitter”,“pinIt”:“Pin it”,“download”:“Download”,“downloadImage”:“Download image”,“fullscreen”:“Fullscreen”,“zoom”:“Zoom”,“share”:“Share”,“playVideo”:“Play Video”,“previous”:“Previous”,“next”:“Next”,“close”:“Close”,“a11yCarouselPrevSlideMessage”:“Previous slide”,“a11yCarouselNextSlideMessage”:“Next slide”,“a11yCarouselFirstSlideMessage”:“This is the first slide”,“a11yCarouselLastSlideMessage”:“This is the last slide”,“a11yCarouselPaginationBulletMessage”:“Go to slide”},“is_rtl”:false,“breakpoints”:{“xs”:0,“sm”:480,“md”:768,“lg”:1025,“xl”:1440,“xxl”:1600},“responsive”:{“breakpoints”:{“mobile”:{“label”:“Mobile Portrait”,“value”:767,“default_value”:767,“direction”:“max”,“is_enabled”:true},“mobile_extra”:{“label”:“Mobile Landscape”,“value”:880,“default_value”:880,“direction”:“max”,“is_enabled”:true},“tablet”:{“label”:“Tablet Portrait”,“value”:1024,“default_value”:1024,“direction”:“max”,“is_enabled”:true},“tablet_extra”:{“label”:“Tablet Landscape”,“value”:1200,“default_value”:1200,“direction”:“max”,“is_enabled”:true},“laptop”:{“label”:“Laptop”,“value”:1366,“default_value”:1366,“direction”:“max”,“is_enabled”:true},“widescreen”:{“label”:“Widescreen”,“value”:2400,“default_value”:2400,“direction”:“min”,“is_enabled”:true}}, “hasCustomBreakpoints”:true},“version”:“3.31.2”,“is_static”:false,“experimentalFeatures”:{“e_font_icon_svg”:true,“additional_custom_breakpoints”:true,“container”:true,“e_optimized_markup”:true,“theme_builder_v2”:true,“hello-theme-header-footer”:true,“nested-elements”:true,“home_screen”:true,“editor_events”:true,“global_classes_should_enforce_capabilities”:true,“e_variables”:true,“cloud-library”:true,“e_opt_in_v4_page”:true,“improved_page_actions_layout”:true,“mega-menu”:true},“urls”:{“assets”:“https:\/\/plumamazing.com\/wp-content\/plugins\/elementor\/assets\/”,“ajaxurl”:“https:\/\/plumamazing.com\/wp-admin\/admin-ajax.php”,“uploadUrl”:“https:\/\/plumamazing.com\/wp-content\/uploads”},“nonces”:{“floatingButtonsClickTracking”:“ba66d21ba2”},“swiperClass”:“swiper”,“settings”:{“page”:[],“editorPreferences”:[]},“kit”:{“active_breakpoints”:[“viewport_mobile”,“viewport_mobile_extra”,“viewport_tablet”,“viewport_tablet_extra”,“viewport_laptop”,“viewport_widescreen”],“global_image_lightbox”:“yes”,“lightbox_enable_counter”:“yes”,“lightbox_enable_fullscreen”:“yes”,“lightbox_enable_zoom”:“yes”,“lightbox_enable_share”:“yes”,“lightbox_title_src”:“title”,“lightbox_description_src”:“description”,“woocommerce_notices_elements”:[],“hello_header_logo_type”:“logo”,“hello_header_menu_layout”:“horizontal”,“hello_footer_logo_type”:“logo”},“post”:{“id”:7320,“title”:“iWatermark%2B%20Help%20%E2%80%93%20Plum%20Amazing%20Site”,“excerpt”:"",“featuredImage”:false}}; var wc_order_attribution = {“params”:{“lifetime”:1.0e-5,“session”:30,“base64”:false,“ajaxurl”:“https:\/\/plumamazing.com\/wp-admin\/admin-ajax.php”,“prefix”:“wc_order_attribution_”,“allowTracking”:true},“fields”:{“source_type”:“current.typ”,“referrer”:“current_add.rf”,“utm_campaign”:“current.cmp”,“utm_source”:“current.src”,“utm_medium”:“current.mdm”,“utm_content”:“current.cnt”,“utm_id”:“current.id”,“utm_term”:“current.trm”,“utm_source_platform”:“current.plt”,“utm_creative_format”:“current.fmt”,“utm_marketing_tactic”:“current.tct”,“session_entry”:“current_add.ep”,“session_start_time”:“current_add.fd”,“session_pages”:“session.pgs”,“session_count”:“udata.vst”,“user_agent”:“udata.uag”}}; var wc_order_attribution = {“params”:{“lifetime”:1.0e-5,“session”:30,“base64”:false,“ajaxurl”:“https:\/\/plumamazing.com\/wp-admin\/admin-ajax.php”,“prefix”:“wc_order_attribution_”,“allowTracking”:true},“fields”:{“source_type”:“current.typ”,“referrer”:“current_add.rf”,“utm_campaign”:“current.cmp”,“utm_source”:“current.src”,“utm_medium”:“current.mdm”,“utm_content”:“current.cnt”,“utm_id”:“current.id”,“utm_term”:“current.trm”,“utm_source_platform”:“current.plt”,“utm_creative_format”:“current.fmt”,“utm_marketing_tactic”:“current.tct”,“session_entry”:“current_add.ep”,“session_start_time”:“current_add.fd”,“session_pages”:“session.pgs”,“session_count”:“udata.vst”,“user_agent”:“udata.uag”}}; var wc_order_attribution = {“params”:{“lifetime”:1.0e-5,“session”:30,“base64”:false,“ajaxurl”:“https:\/\/plumamazing.com\/wp-admin\/admin-ajax.php”,“prefix”:“wc_order_attribution_”,“allowTracking”:true},“fields”:{“source_type”:“current.typ”,“referrer”:“current_add.rf”,“utm_campaign”:“current.cmp”,“utm_source”:“current.src”,“utm_medium”:“current.mdm”,“utm_content”:“current.cnt”,“utm_id”:“current.id”,“utm_term”:“current.trm”,“utm_source_platform”:“current.plt”,“utm_creative_format”:“current.fmt”,“utm_marketing_tactic”:“current.tct”,“session_entry”:“current_add.ep”,“session_start_time”:“current_add.fd”,“session_pages”:“session.pgs”,“session_count”:“udata.vst”,“user_agent”:“udata.uag”}}; var sv_wc_payment_gateway_payment_form_params = {“order_button_text”:“Place order”,“card_number_missing”:“Card number is missing”,“card_number_invalid”:“Card number is invalid”,“card_number_digits_invalid”:“Card number is invalid (only digits allowed)”,“card_number_length_invalid”:“Card number is invalid (wrong length)”,“card_type_invalid”:“Card is invalid”,“card_type_invalid_specific_type”:“{card_type} card is invalid”,“cvv_missing”:“Card security code is missing”,“cvv_digits_invalid”:“Card security code is invalid (only digits are allowed)”,“cvv_length_invalid”:“Card security code is invalid (must be 3 or 4 digits)”,“card_exp_date_invalid”:“Card expiration date is invalid”,“check_number_digits_invalid”:“Check Number is invalid (only digits are allowed)”,“check_number_missing”:“Check Number is missing”,“drivers_license_state_missing”:“Driver’s license state is missing”,“drivers_license_number_missing”:“Driver’s license number is missing”,“drivers_license_number_invalid”:“Driver’s license number is invalid”,“account_number_missing”:“Account Number is missing”,“account_number_invalid”:“Account Number is invalid (only digits are allowed)”,“account_number_length_invalid”:“Account Number is invalid (must be between 5 and 17 digits)”,“routing_number_missing”:“Routing Number is missing”,“routing_number_digits_invalid”:“Routing Number is invalid (only digits are allowed)”,“routing_number_length_invalid”:“Routing Number is invalid (must be 9 digits)”,“first_name_unsupported_characters”:“First name contains unsupported characters”,“last_name_unsupported_characters”:“Last name contains unsupported characters”}; window.gtranslateSettings = /* document.write */ window.gtranslateSettings || {};window.gtranslateSettings[‘58244860’] = {“default_language”:“en”,“languages”:[“af”,“ar”,“hy”,“az”,“eu”,“be”,“bn”,“bs”,“bg”,“ca”,“ceb”,“ny”,“zh-CN”,“zh-TW”,“co”,“hr”,“cs”,“da”,“nl”,“en”,“et”,“tl”,“fi”,“fr”,“de”,“gl”,“ka”,“el”,“gu”,“ht”,“ha”,“haw”,“iw”,“hi”,“hmn”,“hu”,“is”,“ig”,“id”,“it”,“ja”,“jw”,“kn”,“kk”,“km”,“ko”,“ku”,“ky”,“lo”,“lv”,“lt”,“ms”,“ml”,“mi”,“mr”,“mn”,“my”,“ne”,“no”,“ps”,“fa”,“pl”,“pt”,“pa”,“ro”,“ru”,“sm”,“sr”,“st”,“sn”,“sd”,“si”,“sk”,“sl”,“so”,“es”,“su”,“sw”,“sv”,“tg”,“ta”,“te”,“th”,“tr”,“uk”,“ur”,“uz”,“vi”,“cy”,“xh”,“yi”,“yo”,“zu”],“url_structure”:“sub_directory”,“native_language_names”:1,“detect_browser_language”:1,“flag_style”:“2d”,“flag_size”:16,“wrapper_selector”:“#gt-wrapper-58244860”,“alt_flags”:{“en”:“usa”},“horizontal_position”:“inline”}; wp.i18n.setLocaleData( { ‘text direction\u0004ltr’: [ ‘ltr’ ] } ); var ElementorProFrontendConfig = {“ajaxurl”:“https:\/\/plumamazing.com\/wp-admin\/admin-ajax.php”,“nonce”:“8082dd0100”,“urls”:{“assets”:“https:\/\/plumamazing.com\/wp-content\/plugins\/elementor-pro\/assets\/”,“rest”:“https:\/\/plumamazing.com\/wp-json\/”},“settings”:{“lazy_load_background_images”:true},“popup”:{“hasPopUps”:true},“shareButtonsNetworks”:{“facebook”:{“title”:“Facebook”,“has_counter”:true},“twitter”:{“title”:“Twitter”},“linkedin”:{“title”:“LinkedIn”,“has_counter”:true},“pinterest”:{“title”:“Pinterest”,“has_counter”:true},“reddit”:{“title”:“Reddit”,“has_counter”:true},“vk”:{“title”:“VK”,“has_counter”:true},“odnoklassniki”:{“title”:“OK”,“has_counter”:true},“tumblr”:{“title”:“Tumblr”},“digg”:{“title”:“Digg”},“skype”:{“title”:“Skype”},“stumbleupon”:{“title”:“StumbleUpon”,“has_counter”:true},“mix”:{“title”:“Mix”},“telegram”:{“title”:“Telegram”},“pocket”:{“title”:“Pocket”,“has_counter”:true},“xing”:{“title”:“XING”,“has_counter”:true},“whatsapp”:{“title”:“WhatsApp”},“email”:{“title”:“Email”},“print”:{“title”:“Print”},“x-twitter”:{“title”:“X”},“threads”:{“title”:“Threads”}}, “woocommerce”:{“menu_cart”:{“cart_page_url”:“https:\/\/plumamazing.com\/shopping-cart\/”,“checkout_page_url”:“https:\/\/plumamazing.com\/checkout4\/”,“fragments_nonce”:“52d51ffc7d”}}, “facebook_sdk”:{“lang”:“en_US”,“app_id”:""},“lottie”:{“defaultAnimationUrl”:“https:\/\/plumamazing.com\/wp-content\/plugins\/elementor-pro\/modules\/lottie\/assets\/animations\/default.json”}}; (function(){function c(){var b=a.contentDocument||a.contentWindow.document;if(b){var d=b.createElement(‘script’);d.innerHTML=“window.__CF$cv$params={r:‘96dd1b0c0bffa0bd’,t:‘MTc1NDk3MTY0Ni4wMDAwMDA=’};var a=document.createElement(‘script’);a.nonce=”;a.src=‘/cdn-cgi/challenge-platform/scripts/jsd/main.js’;document.getElementsByTagName(‘head’)[0].appendChild(a);“;b.getElementsByTagName(‘head’)[0].appendChild(d)}}if(document.body){var a=document.createElement(‘iframe’);a.height=1;a.width=1;a.style.position=‘absolute’;a.style.top=0;a.style.left=0;a.style.border=‘none’;a.style.visibility=‘hidden’;document.body.appendChild(a);if(‘loading’!==document.readyState)c();else if(window.addEventListener)document.addEventListener(‘DOMContentLoaded’,c);else{var e=document.onreadystatechange||function(){};document.onreadystatechange=function(b){e(b);‘loading’!==document.readyState&&(document.onreadystatechange=e,c())}}}})();