Volume Manager For Mac Manual
Volume Manager For Mac Manual
IMPORTANT: There’s a lot of jargon in this field/manual. To help, there are “Tutor Tips.” Hold the cursor over words with a green dot or dotted underline to see the definition.
Volume Manager Manual
Section titled “Volume Manager Manual”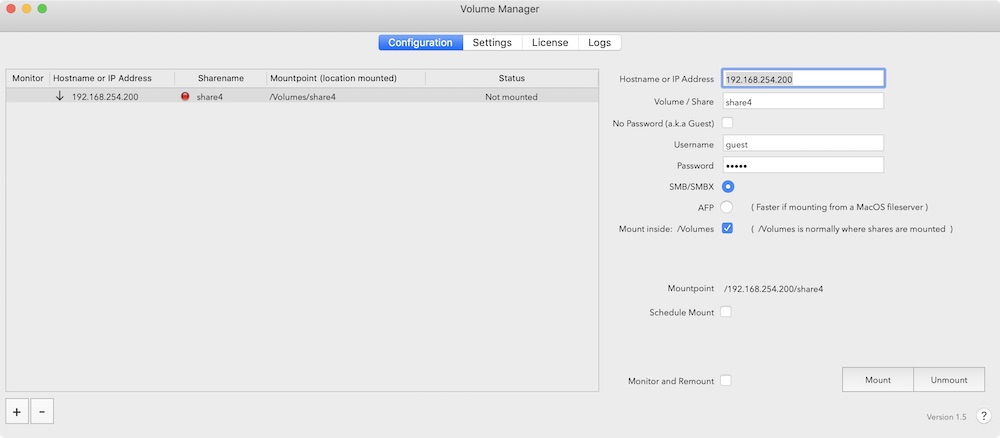
Requirements
Section titled “Requirements”Intel/Apple Silicon – macOS 10.11–15.1+
IMPORTANT: 2 versions
Section titled “IMPORTANT: 2 versions”We created 2 versions of Volume Manager. One is for sale in our store and the other in Apple’s App Store. While both versions are nearly identical, the App Store version requires sandboxing, meaning external volumes mount within a restricted container for enhanced security. Volume Manager for the Apple App Store limits direct access to /Volumes without explicit user permission each time, which complicates functionality. If that is important to you, we recommend downloading Volume Manager from plumamazing.com instead of the App Store for easier functionality.
Adding semi‑permanent access to /Volumes in the App Store build would involve complex coding and Apple’s review process, with no guarantee of approval. For a less restricted experience, use the website version.
Languages
Section titled “Languages”Localizations: ✔ English, ✔ Korean, ✔ Spanish, ✔ French, ✔ German, ✔ Japanese, ✔ Chinese, ✔ Urdu, ✔ Arabic
If your Mac is set to Arabic, then Volume Manager will open with Arabic menus and dialogs. To set Volume Manager in another language (different from the System setting), see the last FAQ item below.
Terminology
Section titled “Terminology”The following terms help both beginners and experts understand the app’s functionality.
To “mount” a volume is the process by which the operating system makes files and directories on a storage device (like a network drive or server share) available via the file system. Once mounted, the volume appears in Finder under Locations, allowing you to interact with it like a locally attached drive.
Mount Point
Section titled “Mount Point”A “mount point” is the location on your Mac where the mounted volume is accessible. In macOS, this is usually a folder under /Volumes/ (for example, /Volumes/SharedDrive).
Network
Section titled “Network”A “network” is a group of connected devices that can communicate with each other. Volumes managed by Volume Manager are typically shared over a local area network (LAN) or via the Internet.
Network Volume
Section titled “Network Volume”A “network volume” is a storage device (such as a hard drive) shared over a network. These volumes are not directly attached to your Mac but can be accessed using the SMB protocol.
Network Sharing
Section titled “Network Sharing”Network sharing allows resources to be shared over a network—files, documents, folders, media, etc. By connecting a device to a network, other users/devices in the network can share and exchange information through this network.
Server
Section titled “Server”A server is a computer or device that provides services, such as file sharing, to other devices on the network. In the context of Volume Manager, the server hosts the shared network volume you want to mount.
Server Path
Section titled “Server Path”The “server path” is the address used to locate the shared volume. It typically follows this format:
smb://<server-address>/<share-name>
Examples: smb://192.168.0.100/MySharedFolder or smb://NAS/SharedFiles. The <server-address> can be an IP address (e.g., 192.168.0.100) or a hostname (e.g., NAS).
SMB (Server Message Block)
Section titled “SMB (Server Message Block)”The network protocol used for sharing files, folders, and other resources over a network. SMB is supported by Volume Manager and is widely used across macOS, Windows, and other devices.
Credentials
Section titled “Credentials”The username and password needed to authenticate with a network server or volume. Some volumes allow guest access, while others require specific credentials for security.
Auto‑Mount
Section titled “Auto‑Mount”Automatically mounts a configured network volume when your Mac starts, wakes from sleep, or reconnects to the network.
Local Area Network (LAN)
Section titled “Local Area Network (LAN)”A LAN is a network of devices within a small geographic area, such as your home or office. Volume Manager is designed to mount SMB network drives shared on the same LAN.
Dynamic DNS (DDNS)
Section titled “Dynamic DNS (DDNS)”A service that provides a consistent hostname for your network, even if your public IP address changes. DDNS is useful for accessing network volumes over the Internet without tracking IP changes.
Public IP Address
Section titled “Public IP Address”The unique address assigned to your router by your Internet Service Provider (ISP). It’s required to access your network from outside (e.g., for mounting drives over the Internet). Often called “External IP,” to distinguish from the “Internal (Private) IP” assigned on your local network.
Port Forwarding
Section titled “Port Forwarding”A router setting that forwards external requests (from the Internet) to a specific device on your local network. For example, forward SMB traffic on port 445 to a server on your LAN to allow remote access.
Firewall
Section titled “Firewall”A security system that controls incoming and outgoing network traffic. If SMB traffic is blocked by your firewall, you may need to allow port 445 to enable connections.
Dynamic IP Address
Section titled “Dynamic IP Address”An IP address assigned to a device that can change periodically. If your server or router uses a dynamic IP, you may need DDNS to maintain consistent access.
VPN (Virtual Private Network)
Section titled “VPN (Virtual Private Network)”Creates a secure, encrypted connection between your device and your home or office network. Using a VPN is a safer alternative to exposing your network volumes directly via port forwarding.
Finder
Section titled “Finder”Finder is macOS’s file manager where mounted volumes appear under Locations. From Finder, you can browse, open, and manage files on your mounted network drives.
A share is a portion of a volume or folder that is made accessible to other devices over a network. It allows users to access specific parts of a volume without exposing the entire volume.
Volume
Section titled “Volume”A volume is a storage unit—typically a logical section of a physical drive or a networked drive—formatted with a filesystem (e.g., APFS, NTFS) and ready to store data.
Installation
Section titled “Installation”Download Volume Manager from Plum Amazing. The app will be downloaded to the Downloads folder; move it to the Applications folder and double‑click to launch. It will appear in the menu bar. Then use the Quick Start below.
To uninstall, quit the app and drag it to the Trash.
The preference file is here:
~/Library/Preferences/com.plumamazing.volumemanager.plist
Quick Start
Section titled “Quick Start”Step 1. When you first start Volume Manager, no records are present in the Identity table. Click the + button at the bottom‑left to add a new record.
Step 2. The sample Mount Identity record contains fake data. Modify the sample with your own data to mount a volume, or click + to create a new record. Start by changing the Mount Identity to a unique phrase that lets you easily identify which volume is being mounted by this record.
Step 3. The field named “File Server Hostname or IP Address” is crucial. You have three options:
- Enter the IP address of the fileserver that holds the volume. This is the safest and most accurate way. Avoid this only if the server’s address changes frequently (DHCP).
- If your organization uses DNS and has a hostname configured for the fileserver, enter the DNS hostname. Volume Manager will resolve this to an IP address; if it fails, you’ll see “hostname is not resolvable.”
- Use Finder → Go → Connect to Server (Command+K) to discover available shares. For macOS servers use
afp://IP(legacy) or for Windows/NAS usesmb://IP. Authenticate, then select one of the listed share names and use that in Volume Manager’s “Volume or Share Name.”
Step 4. Volume Manager must provide a username and password to the fileserver to authenticate you and grant access.
Step 5. To enable monitoring and automatic re‑mounting, check “Monitor and Remount.” Volume Manager will attempt to re‑mount only when it can reach the fileserver across the network.
Step 6. Optionally schedule a mount time (e.g., at the start of the work day).
FAQ (Frequently Asked Questions)
Section titled “FAQ (Frequently Asked Questions)”Q: I downloaded the Apple App Store version and can’t mount in /Volumes.
A: Use the Plum Amazing Store version. The App Store version is sandboxed and cannot mount directly to /Volumes without user prompts. The Store version mounts easily inside the /Volumes/ path.
Q: I’m getting an “invalid hostname” error.
A: In “Hostname or IP Address,” try using the server’s IP address instead of a hostname.
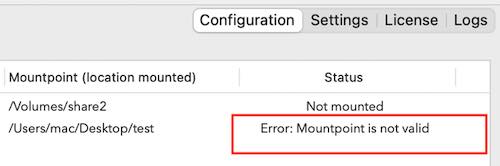
Q: On a new M‑series Mac I can’t get my shares back and see “Mountpoint is not valid.”
A: Turn off File Sharing, restart the Mac, then turn File Sharing back on.
Q: Why was AFP removed?
A: Apple deprecated AFP in Big Sur; SMB is the supported protocol. See Apple’s guidance and referenced articles for details.
Q: Why can’t I add more shares?
A: Each Mount Point name must be unique. After 30 days of use you must purchase the app to add more shares.
Q: Why doesn’t my share re‑mount automatically?
A: Ensure “Monitor and Remount” is enabled for that drive. After deep sleep, re‑mounting can take a short while.
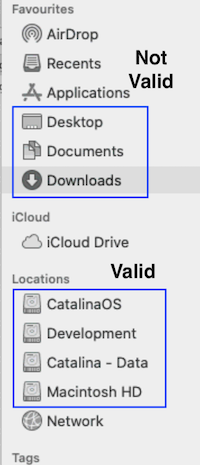
Q: Why does VM mount to the root and not my desired location?
A: Not every path is valid for mounting. Choose a valid mount point under Locations (see screenshots below).
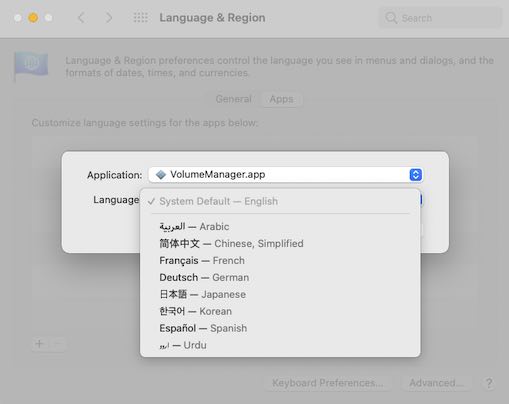
Q: How do I change the language used in Volume Manager?
A: If the system language is French, Volume Manager will open in French. To set a language for just this app: System Settings → Language & Region → Apps → Add the app and choose a language; relaunch the app.
Glossary (Quick Reference)
Section titled “Glossary (Quick Reference)”- Share: The folder exported by a server/NAS to the network.
- SMB: Network protocol used to access a share (recommended; successor to legacy AFP on macOS).
- Mount: Attach a remote share so it appears like a local drive.
- Mount Point: Local folder where the share is attached (usually under
/Volumes/). - Hostname: Human‑readable address (e.g.,
nas.local). - IP address: Numeric address (e.g.,
192.168.1.20). - Credentials: Username/password used to authenticate to the server.
- DDNS: Service that maps a changing IP to a fixed hostname.
- VPN: Secure tunnel for remote network access; preferred over exposing SMB to the internet.
New to Network File Sharing (SMB) – The Basics
Section titled “New to Network File Sharing (SMB) – The Basics”If you’re new to this topic, start here. Volume Manager automates mounting shared folders (“shares”) from another computer or NAS onto your Mac so they behave like local drives.
- What you need: a server/NAS with a shared folder, its network address (IP or hostname), share name, and login credentials (if required).
- How it works: your Mac connects over the network using the SMB protocol to the server and mounts the share at a mount point (usually under
/Volumes/). - When it’s useful: accessing team files on an office server, connecting to a NAS at home, or re‑mounting shares reliably after sleep, Wi‑Fi drops, or restarts.
- Terms to know: SMB, share, mount, mount point, credentials, LAN, VPN. See the Terminology section above.
Tip: If you can manually connect in Finder (Command+K), you can automate the same connection in Volume Manager.
Security and Best Practices
Section titled “Security and Best Practices”- Prefer SMB 3.x: Use modern SMB versions on servers/NAS for better performance and encryption.
- Avoid exposing SMB to the internet: Don’t port‑forward 445 unless absolutely necessary. Use a VPN to reach your LAN securely.
- Least‑privilege credentials: Create per‑share accounts with only the access users need. Avoid admin accounts for daily mounts.
- Use static or reserved DHCP IPs: Prevents hostname/IP drift so mounts stay reliable.
- Name mounts uniquely: Each Mount Identity and mount point should be unique to avoid collisions.
- Graceful sleep/wake: Allow a short delay after wake for Wi‑Fi and servers to come back before expecting immediate re‑mounts.
- Encrypt in transit (when needed): Enable SMB encryption on the server for sensitive data (performance trade‑off).
Troubleshooting Checklist
Section titled “Troubleshooting Checklist”- Can you mount manually in Finder (Command+K) using the same
smb://path? If not, fix that first. - If hostname fails, try the server’s IP. If IP works but hostname doesn’t, it’s a DNS issue.
- Verify credentials; guest/anonymous access may be disabled.
- Confirm the share name spelling/case; check the server’s list of shared folders.
- Check firewall rules on both Mac and server; SMB uses TCP 445.
- On NAS/servers, ensure SMB service is enabled and AFP/legacy services are not required.
- If mounts don’t auto‑return after sleep, confirm “Monitor and Remount” is enabled and give the network a moment to reconnect.
- Ensure the chosen mount point is valid (see screenshots above for valid Locations).
Example Configurations
Section titled “Example Configurations”Home NAS on LAN
Section titled “Home NAS on LAN”- NAS at
192.168.1.20, shareMedia. - Volume Manager path:
smb://192.168.1.20/Media - Credentials: non‑admin user with read/write as needed.
- Monitor and Remount: enabled.
Office Server with DDNS
Section titled “Office Server with DDNS”- Public DNS:
files.example-ddns.net→ office router. - VPN required to reach LAN; do not port‑forward 445.
- Mount after VPN connects:
smb://fileserver.lan/Projects.
Multiple Shares, Different Roles
Section titled “Multiple Shares, Different Roles”smb://nas/Engineering(RW for ENG users),smb://nas/Media(RO for most).- Use separate Mount Identities and credentials per share.