Installation
Welcome to the iClock Manual and how to install iClock. It’s easy.
Download & Install
Section titled “Download & Install”You can get iClock from three locations:
- plumamazing.com (recommended) - Fastest updates
- Apple App Store - Subscription version (monthly/yearly with 45-day trial)
- Apple App Store - One-time purchase version
Installation Steps
Section titled “Installation Steps”- Download the app from plumamazing.com or the Apple App Store
- If downloaded as a zip file, unzip (uncompress) it
- Move the app to your Applications folder
- Double-click to launch the app
- iClock will appear on the right side of your menu bar
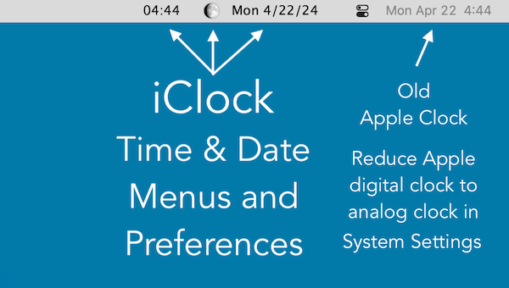
After First Launch
Section titled “After First Launch”You may see two digital clocks in your menu bar (iClock’s and Apple’s). To avoid confusion, you should change Apple’s clock to analog.

How to Change Apple’s Clock
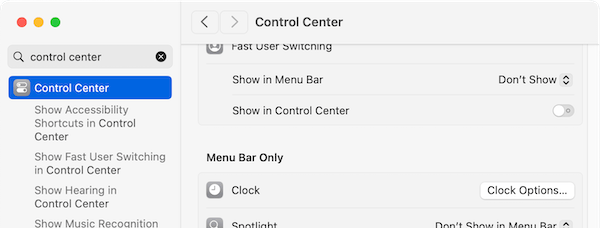
Section titled “How to Change Apple’s Clock”For Mac OS 13, 14+ (Ventura, Sonoma, Sequoia)
Section titled “For Mac OS 13, 14+ (Ventura, Sonoma, Sequoia)”IMPORTANT: To avoid having 2 digital times in the Mac’s menubar, switch Apple’s time to ‘Analog’:
- Open System Settings
- Type “Control Center” in the search
- Scroll down to “Menu Bar Only” section in the right pane
- Click the “Clock Options” button at the bottom right
For Earlier Mac OS (12 and earlier)
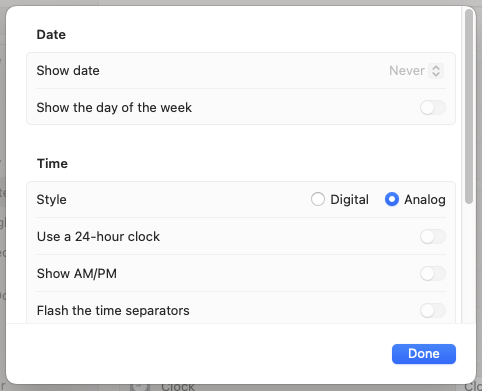
Section titled “For Earlier Mac OS (12 and earlier)”IMPORTANT: For Mac OS 12 and earlier, switch Apple’s time to ‘Analog’:
- Go to System Preferences → Dock & Menu Bar
- Select “Clock Menu Bar” on the left side
- Switch the Time Options from Digital to Analog
This changes Apple’s Time & Date to a small icon and allows you to have iClock without having 2 sets of time and date in the menu bar.
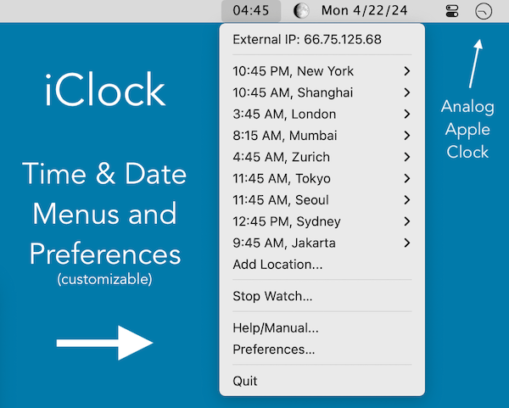
Move Menu Items (Optional)
Section titled “Move Menu Items (Optional)”You can rearrange iClock and other menu bar items on Mac OS 10.12 or higher:
- Hold down the Command key
- Click and hold the mouse on the Time Menu
- Drag it left or right to your preferred position
- Release the mouse
This works for the Date menu and App Menu too. Each can be moved individually. Some items like Apple’s time icon cannot be moved.
Turn On ‘Start at Login’
Section titled “Turn On ‘Start at Login’”To start iClock automatically when you log in:
- Click on the iClock Time menu
- Select “Preferences…” at the bottom
- Go to the iClock:General tab
- Check “Start at Login”
Permissions (Usually Automatic)
Section titled “Permissions (Usually Automatic)”For Mac OS 13, 14+
Section titled “For Mac OS 13, 14+”iClock may request permission for:
- Contacts: To show your contacts’ time zones (optional)
- Calendars: For calendar integration features
To grant these permissions:
- Go to System Settings → Privacy & Security → Privacy
- Select Contacts or Calendars
- Enable the toggle for iClock
For Earlier Mac OS
Section titled “For Earlier Mac OS”Similar permissions can be found in: System Preferences → Security & Privacy → Privacy → Contacts/Calendars
Requirements
Section titled “Requirements”- Mac OS 11+ (Big Sur): Latest version with full features
- Mac OS 10.11-10.15: Use ‘Check for updates’ in File menu
- Mac OS 10.5-10.10: Use iClock Pro 4.4
- Mac OS 10.4: Use iClock 3.05
- Mac OS 10.3.9: Use iClock legacy version
Uninstall
Section titled “Uninstall”If you ever need to uninstall iClock:
- Simply delete the app from your Applications folder
- Optionally, remove preference files from:
~/Library/Preferences/com.plumamazing.iClock.plist
Finding Preference Files
Section titled “Finding Preference Files”- In Finder, press Shift + Command + G
- Type:
~/Library/Preferences/ - Look for files starting with
com.plumamazing.iClock
Troubleshooting
Section titled “Troubleshooting”Two Digital Clocks Showing
Section titled “Two Digital Clocks Showing”Make sure you changed Apple’s clock to analog (see instructions above).
iClock Not Starting
Section titled “iClock Not Starting”- Check that it’s in your Applications folder
- Try launching it directly from Applications
- Check System Preferences → Users & Groups → Login Items
Permission Issues
Section titled “Permission Issues”Grant the necessary permissions in System Settings → Privacy & Security.
Next Steps
Section titled “Next Steps”Once installed, check out:
- Getting Started - Quick setup guide
- Overview - Feature overview
- Preferences - Detailed configuration options